Introduction
Your game is very likely gonna be made of multiple levels, or sections. In the TopDown Engine, just like in Unity in general, there are multiple ways you can structure your levels. The most straigthforward way to do it is to create a scene per level, and have a door/gate/finish line at the end of your level that leads to the next level, but you can also create multiple sections within a single scene. On top of that, the engine comes with ways to link your levels, save data over them, create level selection screens and character selection screens. This page covers all that.
Going to another scene with the Loading Scene Manager
With Unity, usually when you want to go to another scene (in a menu, or to go from one level to the next for example), you’d use the SceneManager API, and probably the SceneManager.LoadScene() method. The native method doesn’t provide enough (or any) visual feedback to the player, and scene loading on mobile for example can be a few seconds long, so just having a black screen there isn’t really good looking. To fix that, the engine comes with its own scene change API, that you’re completely free not to use if you don’t like it.
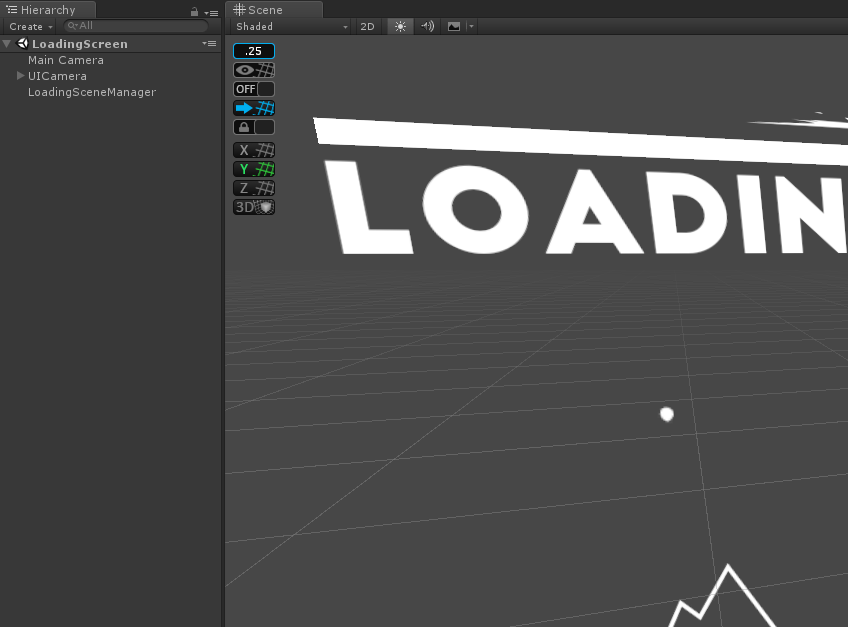
If you want to provide a better experience to your player, you can use the MMSceneLoadingManager :
- it can be called from anywhere, you don’t have to have a MMSceneLoadingManager in your scene
- it handles loading (as the name implies), showing an animation and a progress bar
- it’s completely customizable, just edit the ThirdParty/MoreMountains/MMTools/Tools/MMSceneLoading/LoadingScreens/LoadingScreen scene’s contents. You can easily add your own logo, change the look of the progress bar, what animation is playing, etc.
- it’s pretty simple to use
To use the MMSceneLoadingManager API, when you want to change level, just call the MMSceneLoadingManager.LoadScene (string sceneToLoad) method. The string parameter you pass must of course match the name of the scene you’re trying to load. So if you were to load the Koala Dungeon level for example, you’d use :
MMSceneLoadingManager.LoadScene ("KoalaDungeon");
And the engine will take care of the rest ![]()
Scene Loading via the LevelManager
From the LevelManager’s inspector, you can define a LoadingSceneMode. This method will then be used by a few classes in the engine, like the FinishLevel script or the LevelSelector, to go from one scene to the other. Three modes are available :
- UnityNative : will simply use the SceneManager API to load a new scene
- MMSceneLoadingManager, will use the MMSceneLoading API to load a new scene, as described above. In that mode you’ll have to specify what scene to use as your loading scene. Out of the box you can set “LoadingScreen” to use the scene of the same name. Make sure you add it to your build settings.
- MMAdditiveSceneLoadingManager, will use the more advanced additive scene loading system. You’ll also have to specify a loading scene name, and you can pick any of the additive ones located at ThirdParty/MoreMountains/MMTools/Tools/MMSceneLoading/LoadingScreens/LoadingScreen. If you don’t know which one to pick, start with MMAdditiveLoadingScreen. This mode offers many options, and will give you full control over timing at each and every step, including fade tweens, thread priority, delays, and more.
Creating a new loading screen
- in Unity 6000.5.0f1 (or higher), create a new project and import TopDown Engine v5.0 via the Package Manager
- duplicate the LoadingScreen demo scene, name it NewLoadingScreen
- add it to your build settings (file, build settings, drag your NewLoadingScreen into the “Scenes in Build” panel)
- open it, select the Main Camera, and on its Camera component, let’s change the background color to some red (you can make other changes in the scene if you want to, but that red is how we’ll make sure we’re using the correct one)
- save the scene
- open Minimal2DDoors1, in its LevelManager, set the LoadingSceneName to NewLoadingScreen
- press play, move up/right through the green door, then move right until you see a blue gate, enter it (press space), notice we’re loading our new scene using our newly created loading screen
Level Selection
The engine comes with a built in examples of level selection. It is a carousel containing cards showing info about each level, the LevelSelection scene. It’s fairly simple in terms of logic, simply using the LoadingSceneManager to go to the selected level.
Rooms inside a scene
In certain situations, it might be a good idea to create different sections within a bigger scene. In this case, you’ll want to use the Teleporter component. You can see it in action in many of the demo levels, and a focus on that in the Minimal2DDoors1 demo scene. It’s quite simple to use, you just need two of them (or more) in your scene, you link them via their inspector, define their behaviour, and you’re good to go.
Moving to a certain point in another scenes
The engine also allows you to link different scenes together and specify where to start in each scene, based on where you’re coming from. Maybe you walked to the top of scene A, and there’s a door there that sends you to Scene B. But there may also be a door at the bottom of scene A that sends you to scene C. And once you’re in SceneB you want to go back to the top of A, etc. That’s exactly what the Minimal2DDoors1 and Minimal2DDoors2 demo scenes demonstrate. They use the GoToLevelEntryPoint component.
It’s quite easy to use but requires some setup. First you need to create Entry Points in your target level (if you’re in Scene A and want to go to Scene B, your target level is Scene B). To create Entry Points in Scene B, just create and position empty objects, or pick existing ones (checkpoints for example). Then select your Scene B’s LevelManager, and in its inspector, define how many points of entry you want for this scene, and bind them there one by one.
Once this is done, go back to Scene A, create a door/object with a GoToLevelEntryPoint script on it. Set its various activation conditions and settings however you prefer, set the Level Name accordingly (Scene B in our example), and set the point of entry index for this object. Remember, indexes start at 0. So if you have 3 entry points in SceneB’s LevelManager, index 0 is the first point in that list, index 1 is the second, and so on. And that’s it, you’re good to go!
Procedural Generation of Levels
While most of the demos in the engine feature handcrafted levels, already determined in editor when the scene starts, nothing prevents you from generating your levels procedurally. There are only two things you need to be careful of :
- make sure the levels you generate your levels on Awake, so that they’re ready to use on Start.
- make sure your level conforms to the engine’s specs, and that the outcome of the generation matches what you would have done by hand (walls are on the Obstacles layer, there’s a ground for your characters to walk on, the level manager’s bounds are correctly resized, etc).
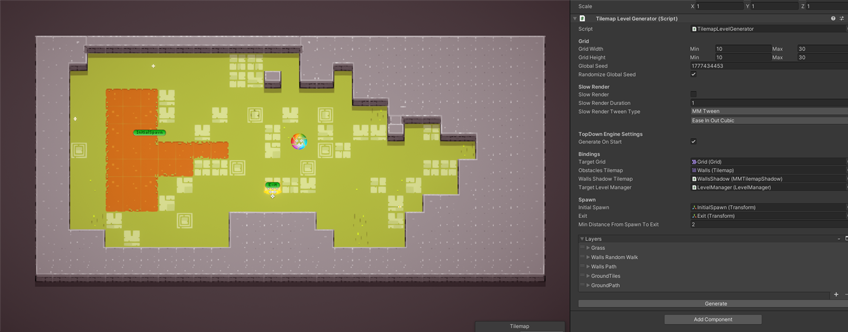
You’ll find an example of it in the KoalaProceduralTilemap demo scene. This scene uses an extended version of the MMTilemapGenerator, the TilemapLevelGenerator. The TilemapLevelGenerator is custom made for the TopDown Engine, and will not only generate a new tilemap based on the rules you’ll have defined, but will also automatically generate wall shadows, place an entry and exit at reasonable and reachable positions, and will resize the level manager. Of course, it’s a very simple, minimalistic example, designed to showcase how to integrate a proc gen pipeline into TDE. You can use it as is, if it fits your needs, or you can look at it for reference to implement your own procedural generation system.
The TilemapGenerator works by generating a grid of 0s and 1s, and painting a Unity Tilemap with these (0 remains empty, 1 becomes a full tile). It uses a number of different algorithms to generate these arrays of 0s and 1s, and lets you combine and customize them to get very unique results.
Here’s a breakdown of its inspector, which will let you generate all sorts of levels :
- Grid : lets you define your grid’s size. You can set a min and max value for both its width and height. This will generate a random size between these min and max bounds, for cases where you wouldn’t want your levels to always be the same size. Of course if you set the same value for your width’s min and max, it’ll remain constant.
- Global Seed : this generator is seeded, which means that if you use the same seed you’ll always get the same result. This could be useful if you wanted, for example, your character to be able to go back to a previous generated level. All you’d have to do would be to store that seed and regenerate a level using it. A checkbox also lets you generate a new seed automatically, but you could handle that generation on your own if you wanted to.
- Slow Render : this is just for show, and will only work at runtime. It lets you render the generation of the level tile by tile. It looks good. Not very practical (and likely to cause issues) if you were to do it outside of test purposes.
- TopDown Engine Settings : a checkbox will let you decide whether generation should happen automatically on Awake. Bindings will let you define what Grid to use, what tilemap to use as obstacles, on what tilemap to paint wall shadows, and a last slot will let you bind your LevelManager. Then you can bind your InitialSpawn and Exit, and the distance you’d like to keep between them. On generation, the system will generate a new level, and then place these two at reachable positions.
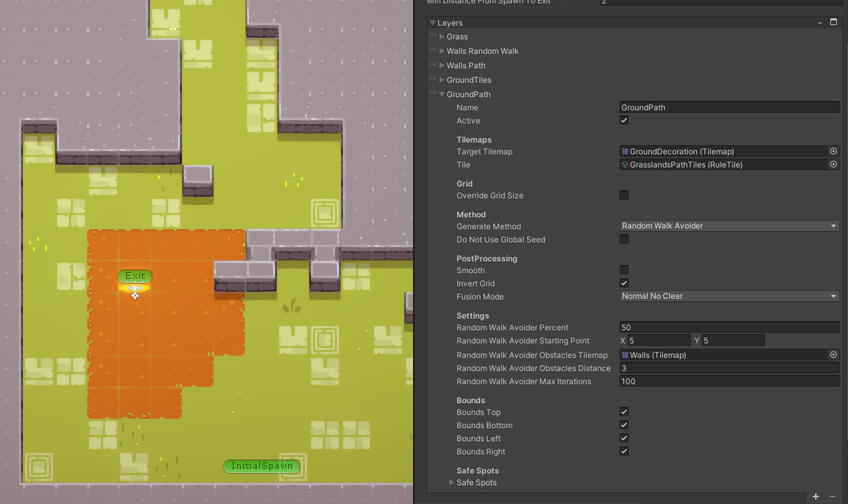
- Layers : this is where the magic happens. Each layer will be made of a target tilemap to paint on, and settings defining how the tiles will be painted. A breakdown of these settings follows :
- Layers : Name : purely used for your own organization purposes, usually designates what that layer will paint
- Layers : Active : if this is not checked, that layered won’t be processed when generating the level
- Layers : Tilemaps : lets you drag a target tilemap to paint on, as well as what Tile to use to paint on it
- Layers : Override Grid Size : by default each layer will paint on a grid of the size of the generator’s general Grid size settings. But you can also override that on a per layer basis.
- Layers : Post Processing : the Smooth option will apply smoothing on the generated grid, attenuating isolated points and spikes everywhere. Invert grid will turn all 0s into 1s, and vice versa. If you’re happy with a shape but think “if only it was the opposite of that”, that’s the checkbox for you.
- Layers : Fusion Mode : these fusion modes will be applied on layers from top to bottom (the last to speak wins). Normal just generates a grid, default mode. NormalNoClear generates a grid, but doesn’t clear it first. Intersect : when painting on a target grid that already has content, will only keep the resulting intersection. Combine : adds the result of this grid to the existing target. Subtract : removes the result of this grid from the existing target.
- Layers : Generate Methods : a number of algorithms you can use to generate patterns. Full : fills the entire grid. Perlin : uses perlin noise to generate a pattern. PerlinGround : same thing, but will aim at keeping a walkable “ground” at the bottom of the grid. Random : randomly paints 0s and 1s. RandomWalk : picks a starting position, then paints like an agent leaving a trail, on a path. RandomWalkAvoider : same thing, but the Walker will avoid obstacles on a separate tilemap you can specify. RandomWalkGround : randomly paints a trail, but tries to keep a walkable ground. Path : carves a path of the specified randomized dimensions. Copy : copies a target tilemap.
- Layers : Bounds : Paints with 1s the left, right, top or bottom bounds (or combinations of those).
- Layers : Safe Spots : lets you define a number of safe spots (defined in grid coordinates) in which that layer will only paint 0s.
This system can take some getting used to, but it’s powerful and can act as a good foundation for your own, bigger solution. Don’t hesitate to look at the KoalaProceduralTilemap demo scene, in it you’ll find a generator with 5 layers already setup to generate interesting patterns :
- Grass : this layer just paints a full grid of grass tiles on the Ground tilemap, as a base for our level
- Walls Random Walk : using the random walk generation, this layer paints 50% of the map with walls
- Walls Path : this layer uses the Combine fusion mode to add an extra, vertical path to the walls grid generated by the layer above it
- Ground Tiles : this layer drops decoration tiles on the ground at random, aiming for 20% fill rate
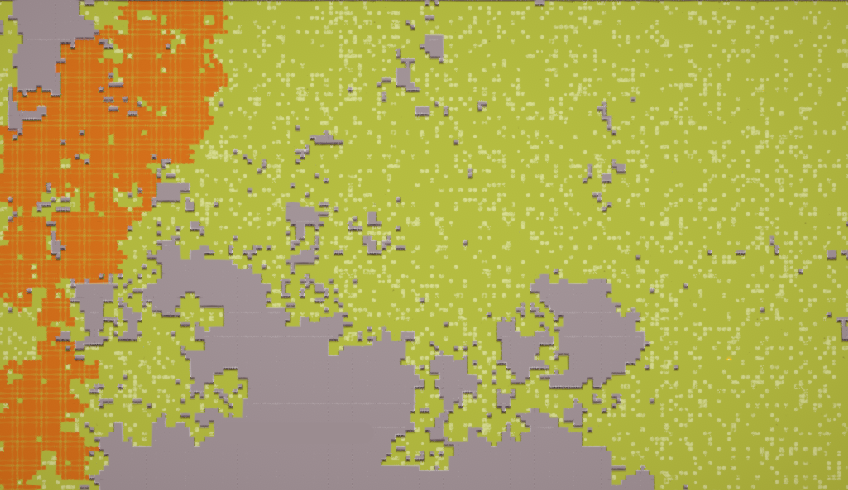
- Ground Path : this layer uses a RandomWalkAvoider algorithm to draw an orange path on the ground, trying to avoid walls to offer a realistic result
One last thing : there’s no limit to this system. The demo generates relatively small levels (it was faster to test), but with a few tweaks to the layers described above and a Grid size multiplied by 10, you can generate entire worlds :