Introduction
Input is at the heart of every game. The TopDown Engine is no exception. It currently supports mobile controls (iOS, Android…) thanks to the integration of Nice Touch, keyboard, gamepad (setup for windows xbox pad but feel free to rebind the keys for other controllers), and mouse.
Default Input
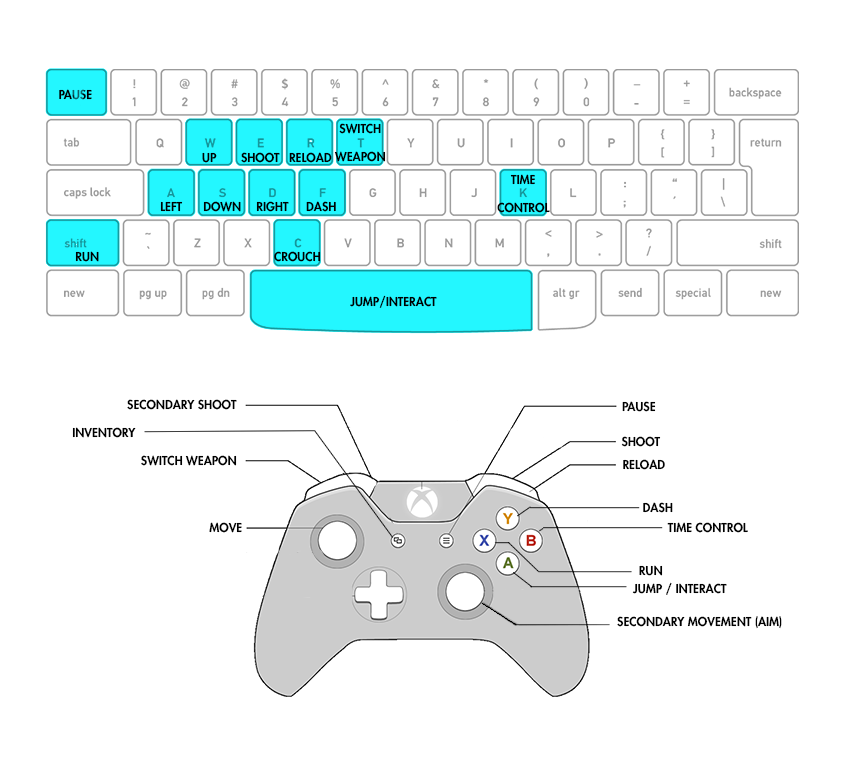
By default the keyboard layout has been created to support 4 simultaneous players. Now that may not be very comfortable for a single player game, feel free to remap the buttons to suit your needs (see the following section). In any case, here is the default layout (click on the image to expand) for Player 1 (check out the input settings for other player bindings):
Input Settings - How to change key bindings?
For keyboard and gamepad (and to a lesser extent mouse), key bindings are defined, like in any good Unity project, via the native Input settings. You can access these via the top menu Edit > Project Settings > Input. This should open a quite large list of “axis”. If you’ve never seen this panel before, maybe have a look at the official documentation first.
Now that list is pretty long. That list has been filled to support 4 players (you could add more if you want), and proposes one key configuration. Feel free to edit each of these to rebind the keys to your preference.
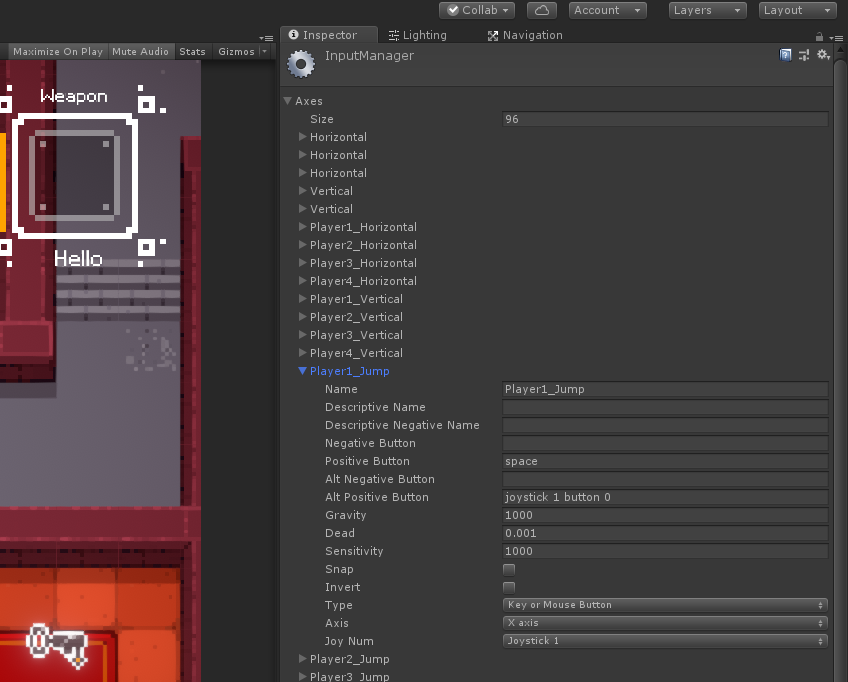
Input Manager and GUI
To move your character on screen, you usually use input, whether it’s via touch on a screen or by pressing mechanical keys. To handle input detection and pass it to your Character, the TopDown Engine uses an Input Manager. Most levels of the TopDown Engine have a UI Camera in them. This UI Camera prefab also has, nested inside it, a bunch of mobile controls used to control the player when playing on mobile. For that reason, and to make binding easier, you’ll find the InputManager at the top level of the UICamera prefab. You can decide to place it on its own game object if you prefer.
The Input Manager is quite a long class. If you take a look at it, you’ll see it’s actually not too complex, just very verbose. It has a lot of methods that you’ll be able to bind to your mobile controls, and manages a small state machine for each of the registered buttons.
From its inspector you’ll be able to specify the PlayerID (see the next section for more on that), whether or not you want to use mobile detection or force mobile controls. You can also decide whether you prefer virtual arrows/dpad or virtual joystick. And finally you can set smooth movement on or off (should a press on left be instant or quickly lerped?), and the horizontal and vertical thresholds.
Player ID
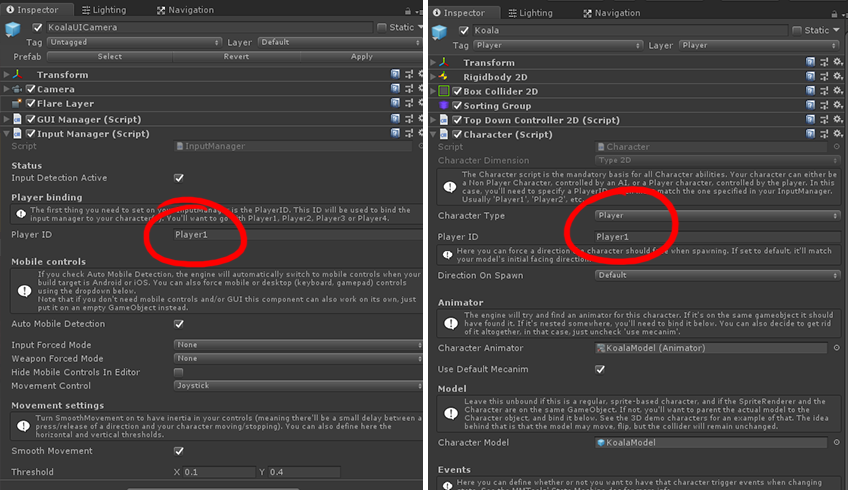
One thing here that is really important to understand is the PlayerID notion. The engine is able to send input from the InputManager to playable characters in the scene (objects with a Character component whose type is set to Player). Each InputManager has a PlayerID attribute, and it’ll send its information to all characters whose own PlayerID attribute match it. So there are a few ways this can work :
- The most common way is to simply let the engine handle this. Add an InputManager to your scene, set its PlayerID to “Player1”. Then in the LevelManager, when you add your character, have the “Auto attribute player IDs” checkbox checked, and it’ll automatically give the playable character the “Player1” ID. If you are in a multiplayer level use “Player2”, “Player3” and “Player4”. You can add your own of course, but these are the default ones.
- You can also set the PlayerID on the prefab. For example you could have a Dog character, whose PlayerID is “JoeTheDog” (why not?). If you add an InputManager to your scene and want it to target that Dog character, set its own PlayerID parameter to “JoeTheDog”. Press play and you should be able to control your Dog character. That method is great if for some reason you don’t want to use the Level Manager and want to instantly move a prefab in the scene.
I use that second method a lot when tweaking a character. Let’s say I want to change the Jump behaviour of my character. I’ll just copy my character’s prefab, put that copy in the scene, set its PlayerID to Player1. Then in the LevelManager I put the original prefab as the Player Prefab. I press play and I’m now controlling two characters with the same input. I can then change the jump settings on one of them (or even add a new Jump script in place of the old one), and play test both very fast to see if my changes are improving the gameplay.
Setting up two characters with separate input
- in Unity 6000.5.0f1 (or higher), create a new project and import TopDown Engine v5.0 via the Package Manager
- open the MinimalScene3D demo scene
- select the LevelManager, set its PlayerPrefabs array size to 2
- select the Suspenders prefab, set its PlayerID to Player2, drag it in the LevelManager in slot 2 (element 1)
- select the UICamera, copy the InputManager comp, paste it as new
- in the newly pasted InputManager, change the PlayerID to Player2
- press play, you can now control the minimal char with wasd, the suspenders with arrows
How does platform detection work?
From the InputManager’s inspector you can turn auto mobile detection on or off.
If you unfold the UICamera prefab, you’ll see it contains quite a lot of stuff, and notably Arrows, Joystick and Buttons canvas groups. They’re disabled by default to allow for simpler level editions but you can turn them on if you prefer, or to tweak them. These are then bound to the GUIManager component (among other stuff). Mobile detection works in a very simple way : if you’re targeting a mobile platform (iOS or Android), it’ll show the controls when you press play. If you’re targeting another platform, it’ll hide and disable them. You can also force one mode or the other from the inspector.
You can also enable ForceDesktopIfPrimaryAxisActive and/or AutoRevertToMobileIfPrimaryAxisInactive. This first option will disable mobile controls if the desktop’s primary axis gets active. This is useful in contexts where your player can interact with the game with both touch controls and a gamepad (like a bluetooth PS5 controller on iPhone). The second one reverts it after a set duration.
Virtual Arrows, Joysticks and Buttons
The asset comes packed with a fully functional arrow D-pad, a joystick and some buttons, but of course you can remix all that, add buttons, add joysticks, etc. to match your own gameplay. You’ll find a demo of all the ready-to-use mobile input building blocks included in the engine in the MMControlsTestScene demo scene.
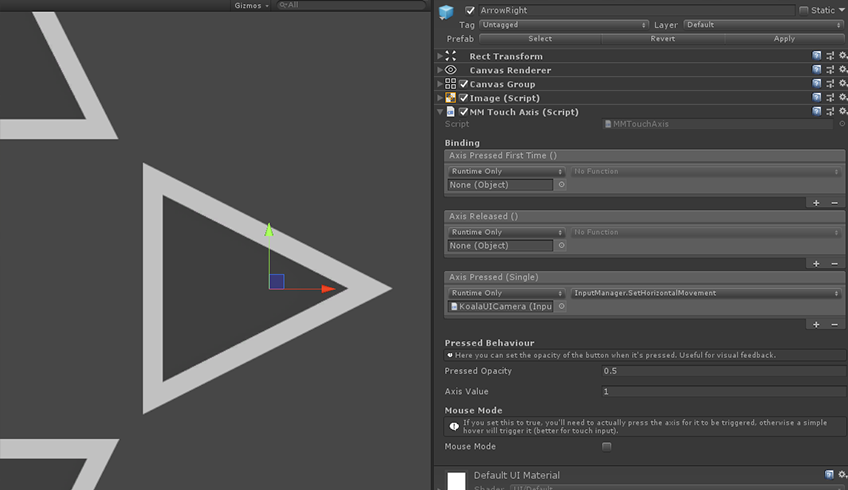
Mobile arrows are very simple, you just need an MMTouchAxis component on a Rect+CanvasGroup object. Then in its inspector you need to set the axis value (usually -1 for left/down or 1 for right/up). Then you need to bind it to your InputManager, simply on the AxisPressed event. To do that, just drag your InputManager (in most cases the UICamera prefab in your scene) onto the little box below “runtime only”, and then select the appropriate method (SetVerticalMovement, SetHorizontalMovement, or their secondary counterparts).
Mobile joysticks are even easier to setup. Just add a MMTouchJoystick component to a Rect+CanvasGroup object, define which axis are enabled (you may want an horizontal only stick for example), the max range (how far the knob can move from its base), and then you bind your input manager to it. Note that you’ll also need to specify a target camera (usually your UICamera).
Repositionable joysticks : similar in aspect to the regular joysticks, these ones reposition within a bigger zone as you lift your thumb and put it back on the screen again.
Buttons work in the same way too, but for them you’ll be able to specify three different events : button down (when it’s pressed for the first time), button pressed (every frame as long as this button remains pressed), and button up (when it’s released). This will allow you in your Character Abilities (for example) to call certain methods when a button gets released for example. You don’t have to bind all events if you’re not using all of them.
Swipe zones : let you drag your thumb across their surface, and trigger swipe events, complete with angle, direction, length, etc.
Customizing mobile input
Using the classes above, you should be able to customize your mobile controls any way you want. For example, if you wanted to add a second joystick to the Loft3D demo scene, and have it control the shotgun that can get picked in that scene, you’d go through the following simple steps :
- select the ShotgunWithAmmo prefab in your project view, set its aim control to PrimaryThenSecondaryMovement
- select your UICamera, set InputForcedMode to Mobile (so that you can test it in editor)
- duplicate the Joystick node under the UICamera’s canvas, move it a bit to the right
- on its joystick knob, on the MMTouchJoystick component, change the Binding to InputManager.SetSecondaryMovement (the vector2 version)
- you’re done, press play and have fun!
Learn more about Nice Touch in its documentation. You’ll also find an example of such a setup in the Colonel demo scene. If you’re testing in editor, make sure to set InputForcedMode to Mobile in its UICamera’s InputManager component’s inspector. In that scene, only two sticks will let you control the Colonel. Left stick moves, while right stick can be used with the secondary aim assault rifle you can pick up North-East from the start position. The right stick is also setup to act as a button so pressing it will shoot. Note that is just one way to set things up, and the engine allows for all possible setups. You could for example opt for a min distance threshold for the stick to shoot, over the simple press showcased in that example (in this case, that’d be a checkbox on your handle weapon ability).
Disabling input
If you wish to disable input, you can do it in two main ways :
- At the InputManager level, by setting InputDetectionActive to false (either via script or via its inspector). This will prevent all input from being read via the InputManager.
- At the ability level, by setting AbilityPermitted to false
Detecting input changes
In many top down action games on desktop, you may want to let the player control aim via a mouse/keyboard combo, or using a gamepad. If you’d like to automatically switch to one or the other, based on which device was used last, you can add a WeaponAimMouseOverride component to your Weapon/WeaponAim and it’ll automatically handle switching its weapon aim control mode to mouse if mouse becomes active. If you then touch any of the gamepad axis again, it’ll switch back aim control to it. The WeaponAim control mode needs to be initially set to a gamepad control mode.
Nice Touch
The TopDown Engine includes another of More Mountains’ assets : Nice Touch. Don’t buy it if you already own the TopDown Engine! I created Nice Touch to provide a simple and fast input solution. It handles keyboard, gamepad, mouse, and touch input. There are a lot of other input solutions out there. Nice Touch/MMControls were created to give a simpler alternative, faster to setup, without unnecessary settings. Feel free to not use these and replace them with your own.
You’ll find these scripts into MMTools/MMControls. That same folder also includes a test scene : MMControlsTestScene. You’ll want to keep that folder in your game. For more information about Nice Touch, feel free to check its documentation.
Using Unity’s “new” input system
The TopDown Engine also supports Unity’s “new” input system, and comes with two examples of it in use. You’ll find them under TopDownEngine/Common/ScriptsInputSystem, and of course they require that you install and setup the Input System package.
You’ll notice there that the InputManager gets replaced by an InputSystemManager, or InputSystemManagerEventsBased, depending on what demo you look at (the event version is best suited for multiplayer, and generally the recommended option). In both cases you’ll find the InputSystemManager under the camera rig. Both rely on another class, TopDownEngineInputActions, which is just the regular auto generated output of the “new” system. Aside from the specific API calls of that system, and the use of that class, there’s nothing specific to it, it works like the regular version. It’s recommended that you have a good understanding of that system to pick this option, like the rest of that system, it’s less intuitive than the classic option.
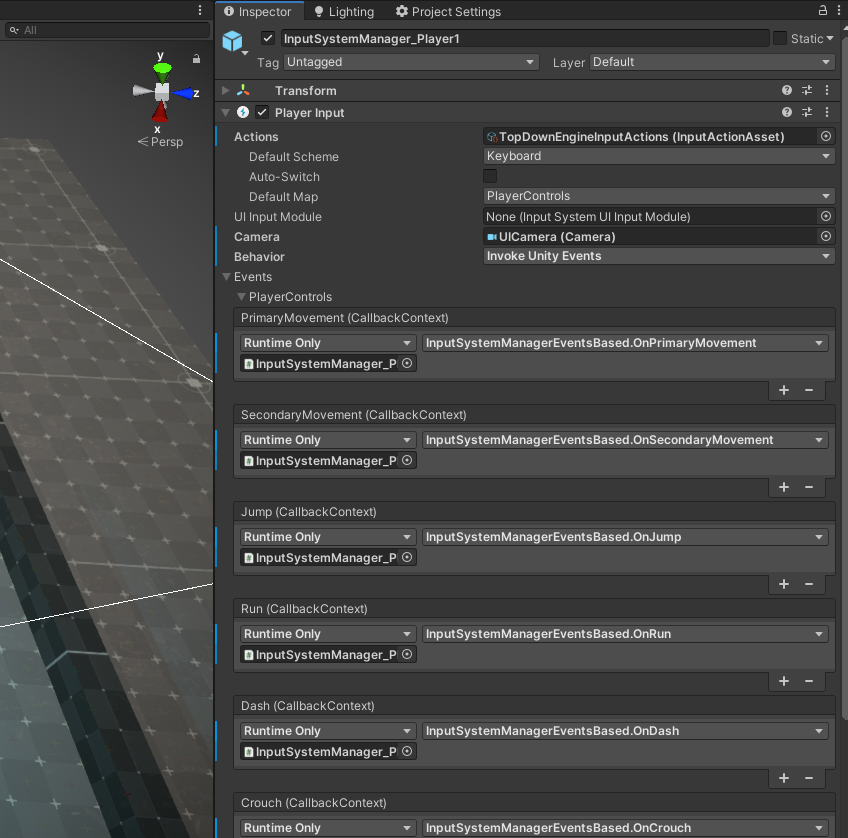
After you’ve installed the InputSystem package, it’s possible that Unity will lose some references, and you may have to setup bindings manually. This should only happen in the MinimalScene3D_InputSystem_Multiplayer scene, the other one should be safe. If that happens, this is what your InputSystemManager_Player1 and InputSystemManager_Player2’s inspectors should look like :
Getting the new input system to work
- in Unity 6000.5.0f1 (or higher), create a new project and import TopDown Engine v5.0 via the Package Manager
- import InputSystem 1.0.1 via the package manager
- open the MinimalScene3D_InputSystem_Multiplayer demo scene
- Unity usually loses some references to the new input system assets, so you may have to bind them again. That’s done like in any project, inside the TopDownEngineInputActions make sure that the Keyboard and Gamepad schemes have the right bindings (Keyboard should be Keyboard and Mouse, gamepad should be gamepad).
- on the InputSystemManager_Player1 (and 2), bind events if references were lost
- press play
Switching from the old to the new input system in an existing demo scene
- in Unity 6000.5.0f1 (or higher), create a new project and import TopDown Engine v5.0 via the Package Manager
- from the package manager, import the InputSystem package
- open MinimalScene2D
- on its KoalaUICamera, remove the InputManager component
- on a new empty, add an InputSystemManager
- in the hierarchy, select the EventSystem object, in its inspector, click its “Replace with InputSystemUIInputModule” button
- press play in your editor, your scene is now using the new input system!