Introduction
In most video games, you’ll likely want to have objects or characters with associated health, and you’ll probably want some way to damage or destroy them. The TopDown Engine comes with its own health and damage system, and will let you setup all sorts of scenarios to have the two interact. This page covers all that.
The Health Component

The health system uses a core component, Health, to define and handle health related interactions. You can add it to any object, it’s autonomous, and will let you damage and eventually destroy that object, and its various fields will define how that happens. You’ll find them grouped under different foldouts :
- Bindings : an optional model you can bind to this Health component, that can be disabled on death
- Status : some read only fields showing the current health of this object and whether it can take damage at this time
- Health : your initial Health when the object initializes, and its maximum health. It’s common to have these two values be equal, but not mandatory
- Damage : this section defines reactions to damage, potential immunity to it, to feedbacks played when getting damaged
- Knockback : lets you define immunity to knockback, as well as a force multiplier (0.5 will cut knockback force in half, 2 will double it, for example)
- Death : this section defines what happens on death (when CurrentHealth reaches or goes below zero). You get fine control over things like delay before actual destruction, model disabling, controller, collisions, layers, and more
- Shared Health and Damage Resistance : here you can set a Master Health. If you set one, all damage this object gets will be routed to the Master Health. This can be useful if you have complex objects, for example a giant mecha with multiple legs, and want all of them to share a unique health
- Animator : lets you specify an Animator to update parameters on. When working with Health on a Character, you can ignore that, the Character component will take care of it
The DamageOnTouch Component
Lower down this page you’ll learn how to apply damage directly via code, but most of the time, you’ll probably want to just use the DamageOnTouch component. As its name suggests, it’s a component that will apply damage to Health components, reducing their current health, on contact. Setting up a damage on touch is extremely easy :
Setting up damage on touch
- in Unity 6000.0.23f1 (or higher), create a new project and import TopDown Engine v4.5 via the Package Manager
- open MinimalScene3D
- create a new cube, position it at -5,0-,5
- set its box collider to trigger
- add a DamageOnTouch component to it, set its TargetLayerMask to Player, set its DamageCausedKnockbackForce to 20,20,0
- press play, walk towards the cube, you’ll get knockback when colliding with it
From the DamageOnTouch inspector, you’ll be able to tweak a number of settings, grouped in the following foldouts :
- Targets : this section is very important, as its TargetLayerMask determines the layer (or layers) that this object will apply damage on. If you want that object to apply damage to your player for example, you’ll want to make sure the Player layer is selected. Note that this is a layer mask, so you can select more than one item in the dropdown. You can also tweak the LayerFilter, to have damage only apply (for example) when entering the collider, but not on stay, etc.
- DamageCaused : damage will be randomized between the Min and Max Damage Caused values in that section. You can of course have both values be the same if you don’t want random damage. You can also define damage types here, as well as knockback intensity (for knockback to apply, the damage’s recipient will need to be a Character). Invincibility duration determines a delay (in seconds) after applying damage where the recipient won’t be able to receive any other damage. And finally, setting RepeatDamageOverTime true will let you setup recurring damage, by defining an amount of repeats, a delay between these repeats (in seconds), and an optional type.
- DamageTaken : the DamageOnTouch component can also apply damage to itself (to its own Health component) when applying damage. This can be useful for a gun’s bullets for example, where you’ll want them to damage their target, but also self destroy, or at least self harm. In this section you can define separate values for damage taken when hitting things that are damageable (that have a Health component) and things that are non damageable (don’t have a Health component).
- Feedbacks : this section lets you bind feedbacks that will play when hitting a damageable, a non damageable, or anything.
Health API
You’ll find the DamageOnTouch component in use throughout the engine in many places, from simple “damage areas”, to melee weapons, or on most projectile weapons’ projectiles. But there may be some cases where you’ll want to apply damage to objects or characters without “touching” them. You can do so very easily via the Health API.
// this will apply 5 damage to the referenced Health component, with 0.5s of invincibility, and in the up direction
aReferenceToSomeHealthComponent.Damage(5f, this.gameObject, 0.5f, 0.5f, Vector3.up);
And sometimes you’ll want to gain health instead of losing it, and it’s also a simple call :
// this will instantly set the current health of the referenced Health component to 30
aReferenceToSomeHealthComponent.SetHealth(30f);
There are plenty of other methods that will let you manipulate health values, instantly kill a character, and more! You can find them all in the API documentation.
Health bars
Being able to damage an object is nice, but in most games you’ll likely want to have some way to display the current health values. The Health API exposes all the relevant values, so you can of course implement your own ways to do so, but you can also use the MMHealthBar helper that ships with the engine. Adding a health bar to an object is very simple :
Setting up a HealthBar
- in Unity 6000.0.23f1 (or higher), create a new project and import TopDown Engine v4.5 via the Package Manager
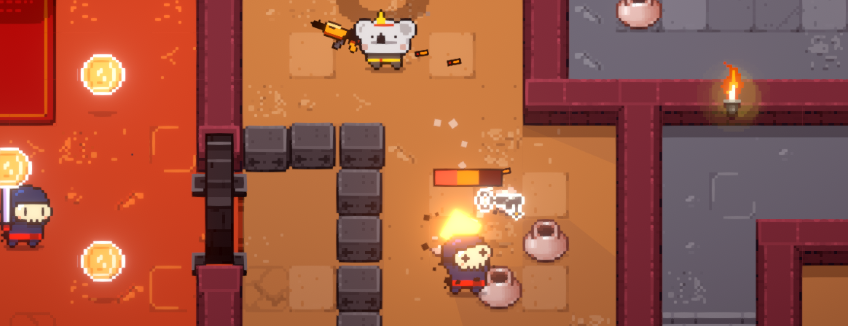
- open KoalaDungeon, drag a DungeonPot prefab into it, position it at 50,-21,0, set its Health’s Initial and Maximum Health to 300
- add a MMHealthBar component to it, set its SortingLayerName to Above
- press play, walk up to grab the rifle and ammo, then shoot at the pot, and you’ll notice its healthbar update as it loses health
From the HealthBar inspector, you’ll be able to customize your health bar appearance easily if you’re in Drawn mode, and you can also switch to Prefab mode, in which case you’ll need to specify a prefab to instantiate and use as your health bar. In its display section you’ll be able to determine whether the bar should be always visible, or only on hit, etc.
Health Components
- Stimpack : the Stimpack class is an example of a simple pickable object that lets you give health to any character (or object) that picks it up. You can see an example of it in the Loft3D demo scene.
- Health Auto Refill : you can add a HealthAutoRefill component to any object with a Health component, and it will refill its health (either in bursts or continuously) based on your settings of choice.
- Inventory Engine Health : you can also have inventory items that impact your health, like the InventoryEngineHealth pickable items, as demonstrated in the Koala demo scene for example (they’re red with a little cross).
Damage Types
A more advanced feature of the damage system is Damage Types. So far the damages we’ve mentioned on this page were of the “base type”, neutral damage. But maybe in your game you’d like to have fire, magic, or poison damage. The engine comes with examples of such damage types (namely Fire, Electricity, Ice and Poison), and creating new ones takes only a second. In any folder, in your Project panel, simply right click Create > More Mountains > TopDown Engine > DamageType and name the created asset anything you want. From there, you’ll be able to use that damage type in DamageOnTouch (Damage Caused > Typed Damages), and anywhere else in the Damage APIs to apply damage of that specific type.
Damage Resistances
Applying these damage types without doing anything else isn’t going to do much through. Their typed value will be added to the base damage value, but you probably want these typed damages to have more than just a numeric effect. That’s where Damage Resistances come in. DamageResistances are components that live on the receiving end of the damage and are thus tied to a Health component. They will let you define the effects of a specific damage type on that object : damage multipliers, condition changes, but also specific feedbacks.
To add resistances to an object with a Health component, you’ll first need to add a DamageResistanceProcessor (usually as a child of the object the Health is on, and make sure you bind it to the TargetDamageResistanceProcessor slot of your Health component). The flow is as follows : when getting damage, the Health component will ask the DamageResistanceProcessor to “process” the damage and compute the actual damage to subtract from the current health. In turn, the processor will then ask each of its individual resistances what should happen. Are you a resistance in charge of Ice damage? If no, it’ll be ignored, if yes, maybe that character has some magical resistance to Ice damage, and we half that damage value. Once all resistances have “spoken”, the processor passes that value back to the Health component.
Note that DamageResistances can also handle weaknesses, or just reactions to damage types, they’re not just for protective armor.
To setup resistances on an object with a Health component, simply follow these steps :
- create a new empty child object on your object’s hierarchy, and add a ResistanceProcessor to it.
- create any number of children objects, each with their own DamageResistance component.
- for each resistance, specify what damage type to use, define damage modifiers and other effects
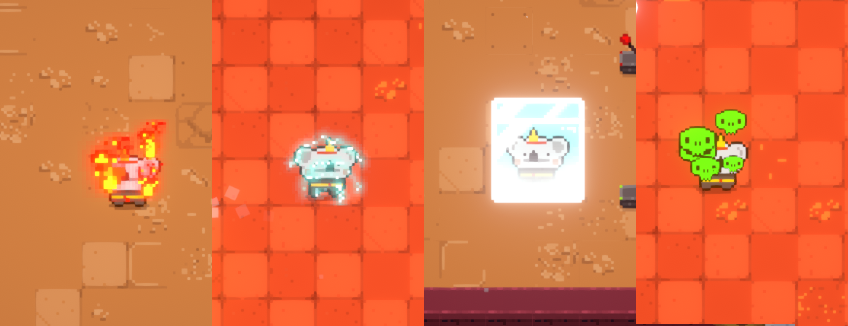
You can see an example of all that in action on the Koala character in the KoalaHealth demo scene. This character has resistances defined for all 4 types of demo damage types, and in the demo you’ll find cannons you can activate that shoot fire, ice, poison and ice projectiles. Each of them will apply different effects : ice will freeze the character, poison will apply recurring damage, fire will simply activate a fire particle system for a short while, and electricty will slow down the character. All the visuals are handled by feedbacks bound the type’s resistance.
Pickable Damage resistances
Maybe your character starts with a strong armor, but maybe it doesn’t, and will be picking resistances as it progresses. If that’s the case, you may want to look at the PickableDamageResistance component. It will let you either add a new Resistance to your character (similar to a pre existing one, but will be basically copied from the picker to the character), or it can activate an exiting one by name, or disable one by name, depending on what works best in your context. You’ll find examples of that in the KoalaHealth demo scene.