The Rooms System
The TopDown Engine has, for a long time, offered the ability to connect different scenes together, or to use teleporters to link parts of a level together. With v1.8, the TopDown Engine now comes with a powerful and versatile Rooms system. This lets you cut a level into “rooms” (whether they’re visually actual rooms or just zones is up to you), and connect these Rooms together using the Teleporter class (whether these Teleporters are represented visually as doors, portals, nothing, or anything else is also up to you). It leverages the power of Unity’s Cinemachine camera system to handle camera transitions between rooms, as well as a few MoreMountains classes to handle fades and sprite masks. This page explains how to do that, and covers the other features and options of the Rooms system.
The KoalaRooms demo scene is a perfect example of that system, showcasing many Rooms, and different ways to setup teleporters. You can also check out the MinimalRooms3D demo scene for an example of how to setup rooms in 3D.
Rooms
To start things off, you’ll want to create Rooms in your level. Whether your level is made of tiles, of 2D sprites or 3D models doesn’t matter. To create a room, simply create a new empty object, add a BoxCollider2D to it if you’re in 2D, or a BoxCollider if you’re in 3D, and a Room component. Resize the collider so that it matches the size of your room, and set isTrigger:true on it.
Nested under the Room, as children, you’ll want to add :
- a confiner : an empty game object, with a BoxCollider.
- a Cinemachine Virtual Camera. On this camera you’ll likely want to have a CinemachineCameraController (ConfineCameraToLevelBounds:false), and a CinemachineConfiner (click the “add extension” button at the bottom of the CinemachineVirtualCamera’s component). On that CinemachineConfiner’s inspector you’ll want to set the Confine Mode to Confine3D, and drag the confiner you just created into the bounding volume slot. In 2D, you’ll also probably gonna want to check Confine Screen Edges.
- one or more Teleporters (we’ll get to that)
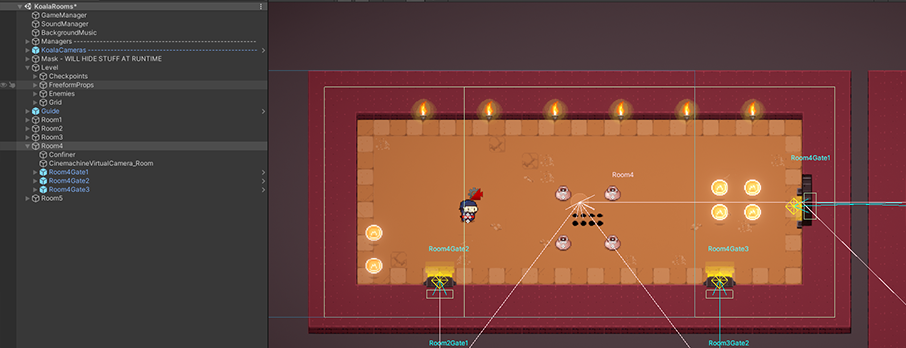
The Room class is responsible for resizing the confiner dynamically on Start to match the camera size (in 2D only), keeping track of its status (visited or not) and triggering events when the player enters the room, exits it, enters it for the first time.
Once you’ve created a room, the best way to go to add more is to duplicate it, reposition it, and resize its colliders to make more. Make sure to give them unique names. While not mandatory, this will make finding them later much easier.
Teleporters
Now that you’ve got multiple rooms, it’s time to add ways to go from one to the other. This is done using the Teleporter class, and its many options.
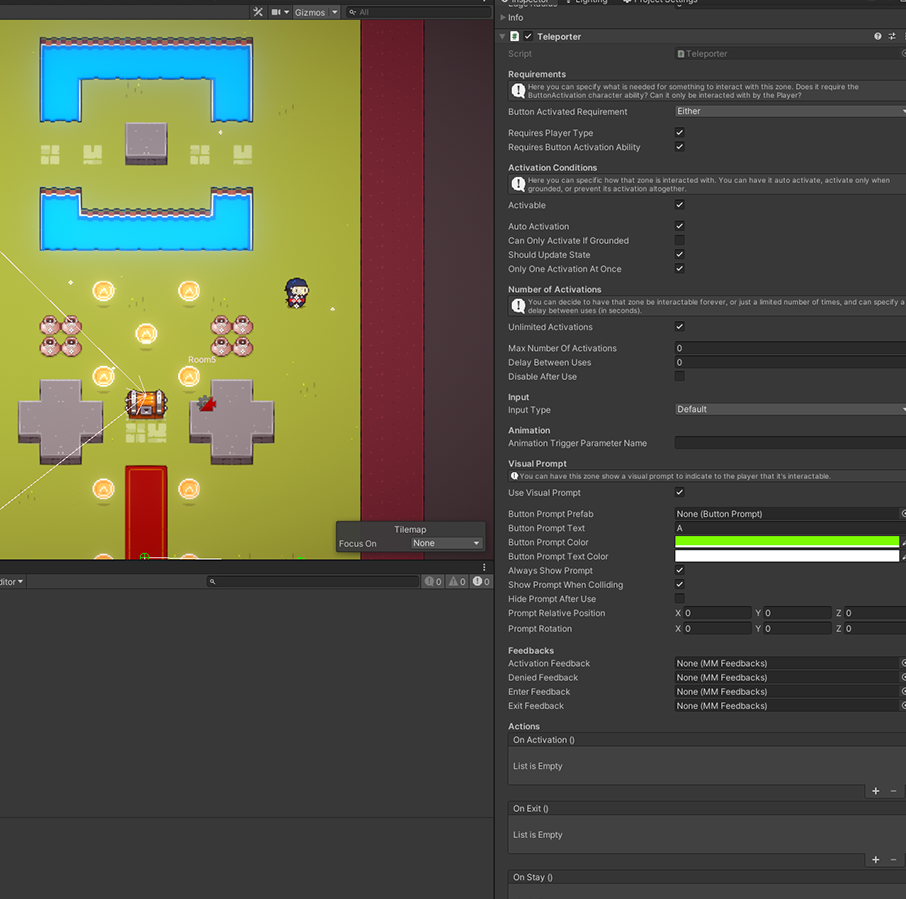
To start things off, add an empty game object within your room, add a BoxCollider2D (in 2D) or BoxCollider (in 3D) to it (IsTrigger set to true), and add a Teleporter script to it. Teleporters have a ton of options. You can define activation requirements, activation conditions, amount of activations, prompts, input, feedbacks, and much more. For a door between rooms, maybe you’ll just want to set AutoActivation to true, so that any Character that gets into the collider gets moved to the new room.
The Teleporter specific fields are at the bottom of the inspector (the top is common to all ButtonActivated zones).

The only mandatory things to set will be the Destination, where you’ll have to drag and drop another teleporter, as well as the Target Room, where you’ll need to drag and drop a Destination Room.
In the Teleporter section you can decide whether that teleporter only affects Player characters, an exit offset (added to the Teleporter’s transform position when something exits it), whether the teleportation should be instant or a tween between entry and exit positions, and whether x or y positions should be maintained.
The Freeze section lets you choose whether you want the teleporter to freeze time and/or the Character when entering it.
In the Rooms section you don’t have to set the CurrentRoom if your Teleporter is nested under a Room, it’ll be automatically detected. You have different camera mode options, Cinemachine priority is the recommended one.
Teleporter Sequence
When getting into a Teleporter and activating it (by pressing an input, or by simply entering it, or via script, depending on your settings), you trigger a series of events known as the Teleporter Sequence. It’s designed to be as customizable as possible, and easy to extend. It’s made of several steps, whose duration (in seconds) you can customize from the bottom of the Teleporter’s inspector.

By default, the steps work as follows (note that not all of each step’s events may happen depending on your settings) :
- SequenceStart : activates the zone (reducing the Use counter, triggering feedbacks, etc), prevents the camera from following, freezes time, freezes the character
- wait for InitialDelay
- AfterInitialDelay : fades the scene out via MMFader
- wait for FadeOutDuration
- AfterFadeOut : teleports the object, either instantly or by starting a smooth position tween, starts the camera transition, lets the current room know that the player has left, starts the mask transition
- wait for DelayBetweenFades
- AfterDelayBetweenFades : makes the camera follow again, fades the scene in via MMFader
- wait for FadeInDuration
- AfterFadeIn : nothing, for now
- wait for FinalDelay
- SequenceEnd : unfreezes time and the character
Each step is a separate method that you can easily override should you want to add more features.
Faders
The Teleporter’s inspector lets you check whether or not you want to trigger a Fade when transitioning to your Destination. This in turn will trigger a MMFadeEvent, that will be caught by a MMFader object in your scene, if you have one. Most demo scenes do, usually within their UICamera object. By default the engine comes with two faders, the classic MMFader (which will tween a UI element’s opacity - usually a black opaque sprite stretched across the whole screen, but not necessarily), and the MMFaderRound, which will apply a mask transition across a UI element.
2D Masks
Usually in 2D, when dealing with multiple rooms in a level you want to obfuscate the rooms the player isn’t in at a specific time. Of course how you decide to do it is closely tied to your rendering choices. While it’d be a bit useless to try and provide a 3D solution for that, as it’d likely mess with your specific shaders, the engine comes with a 2D solution for that issue : the MMSpriteMask. You can create one from scratch, or simply copy the one in the KoalaRooms demo, it’s ready to use.
On its inspector, you’ll be able to have it automatically setup all renderers in the scene at start (which is useful otherwise it actually masks things in scene view, making level edition trickier). If you want an object to be ignored by the Mask at runtime, simply put a NoMask tag on it.
Cinemachine Zones
The Rooms system described above is great if you want complex interactions and a lot of control over transitions. But sometimes you may just crave something simple. That’s when the TopDown Engine’s Cinemachine Zones come in.
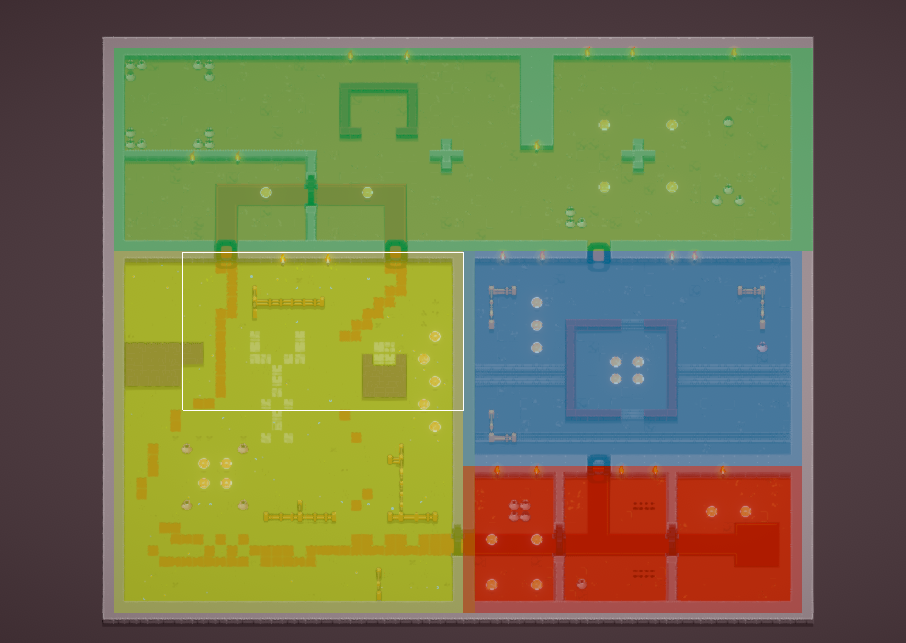
They will let you divide your level in sections (defined by a collider, so they can be shaped and positioned however you want). When the player (or any object/layer you define) enters a zone, a camera transition will occur. What’s great is that zone setup is as automated as possible, and setting up an entire level will take only a few clicks.
You can look at the KoalaCinemachineZones demo scene for a reference of this system in 2D, and at the Colonel demo scene for an example of that in 3D. Creating a zone is very simple, here’s all you have to do :
In this example we’ll work in KoalaCinemachineZones, and for that we’ll disable all existing CinemachineZones. Feel free to adapt sizes and positions to your own context.
- open the KoalaCinemachineZones demo scene
- select the CinemachineZones object in its hierarchy and disable it
- create a new empty gameobject, name it MyZone1, position it at -15,-4,0
- add a BoxCollider2D to it, set its size to 32,32
- add a TopDownCinemachineZone2D to it, set CameraStartsActive:true
- under the KoalaCameras node in the hierarchy, you’ll find a “CM vcam1” object. Make a copy of it, and move it under the MyZone1 object, rename it VirtualCamera, and enable it (it should have been disabled when you copied it)
- drag the VirtualCamera object into MyZone1’s TopDownCinemachineZone2D’s Virtual Camera slot, and in the TriggerMask dropdown, select Player as we want the zone to activate when the player enters it. Set SetupConfinerOnStart:true.
- press play, your camera will now be confined to that zone
- exit play mode, and duplicate MyZone1, name the new object MyZone2, move it to 15,-4,0, set CameraStartsActive:false on it
- that’s it you’ve setup your first two rooms, congrats!
- notice at the bottom of each zone’s inspector you can change the zone’s gizmo color, pick one you like
- you can now add more zones to cover your whole level, position them however you like
- if you want to tweak camera transitions between zones, that’ll be on the CinemachineBrain on your camera (in this case the Regular Camera object under MinimalCameraRig). You’ll want to change the DefaultBlend and its associated duration.
- on each virtual camera you can have completely different settings, feel free to experiment with that!