Introduction
Most games distribute random rewards to the player for certain actions, in one form or the other. In top down games, it’s frequent to have enemies drop loot objects when they die. Hotline Miami enemies will drop their weapon, Diablo monsters will drop random gold and objects, crates may contain random rewards, etc. The TopDown Engine will let you implement similar random loot systems easily. And it’s generic, which means you could use it to implement all sorts of systems where you need controlled randomness : loot boxes, level generation, NPC stats creation, a Borderlands-like weapon generator, etc. Built around the loot table design pattern, as described in more details by Daniel Cook in 2014 in his blog, this system is simple yet powerful, and should open a vast number of possibilities for your game.
Simple loot
The engine includes the PickableItem class, which will handle all the logic of collection, effects, state changes, etc usually found on a collectible picker. It is meant to be extended (or used in conjunction with other classes). You can see an example of it with the Stimpack class, a very simple class that will add health to a Health equipped Character as it collides with it.
Inventory Engine Loot
To let your characters collect Inventory Engine Items, you have a few options, usually either the ItemPicker and PickableItem combo, or the simple InventoryPickableItem :
- ItemPicker : part of the InventoryEngine, this agnostic class is responsible for adding Inventory Items into Inventories via its Pick method
- PickableItem : part of the TopDown Engine, handles collisions, triggers, feedbacks, and state changes on collectible objects in the world, can be used in addition of the ItemPicker for complete control
- InventoryPickableItem : part of the TopDown Engine, extends the InventoryEngine’s ItemPicker, and lets you add a visual effect on pick. It’s a very simple class, which can be used instead as a minimal alternative to the two above.
You’ll find these in action in many of the demo scenes, in the Loft3D demo scene for example.
Defining your loot table
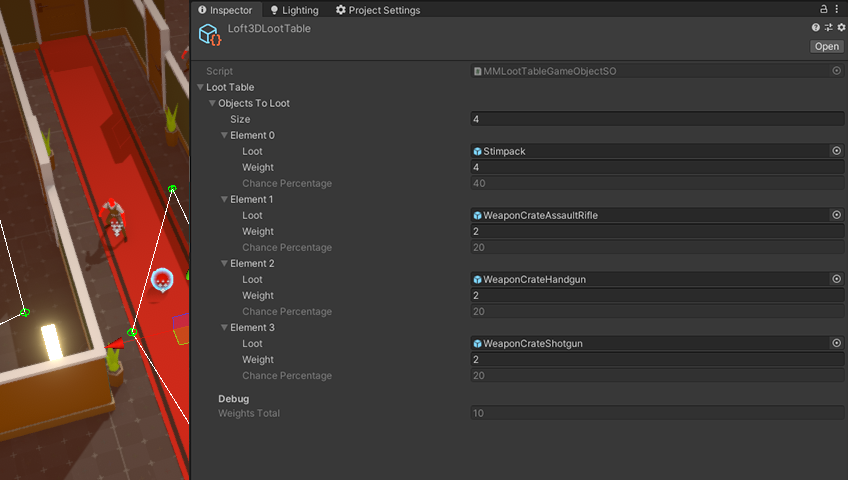
The first thing you’ll want to do before actually dropping loot is define a loot definition. A loot definition is a scriptable object (a data file) that will hold the information on what objects constitute your loot table, and what the chances of getting each object are. To create one, in any folder of your project, go right click > create > More Mountains > Loot Definition. Next, define how many objects your loot table should contain, and for each of them, drag prefabs of the objects you’d like spawned when that loot drops, and specify their respective weights. Weights are relative to each other, they don’t have to add up to any specific number. If you have 3 objects A, B and C, and want C to drop 10 times more often than the others, you could indiscriminately have the following weights : A:1,B:1,C:10, or you could have A:2,B:2,C:20.
Adding loot to my game
To have these objects drop in game, you can use the Loot component. It’s designed to work in conjunction with the Health component, letting you trigger the loot drop on death or on damage. Alternatively, it can be used autonomously, all you have to do is call its SpawnLoot public method, and it’ll drop loot.
For example, you could select one of your enemies, and add a Loot component to it. In its inspector you’ll be able to customize its behaviour :
- Loot mode : Unique will let you spawn a single object, Loot Table will let you define a local loot table (only for this specific enemy/object), and Loot Table Scriptable Object will let you bind a loot definition like the one described in the section above.
- Conditions : will let you decide if you want the loot spawn to happen on death or damage (or both). This requires a Health component.
- The Spawn section will let you define a delay (in seconds), an optionally random quantity of objects to spawn, as well as advanced spawn properties.
- Spawn Properties : here you can define the shape of the area in which the spawned object will be instantiated. You’ll want to pay special attention to the NormalToSpawnPlane, which defines the plane in which the objects will be instantiated. Typically for 3D you’ll go with 0,1,0 and for 2D 0,0,1. The Spawn Properties will also let you specify offsets, radius, random rotation and scale.
- Collisions : an option to have the loot system check for collisions before spawning an object (to avoid a weapon picker appearing in the middle of a wall, for example).
- Feedbacks : like most systems in the engine, you can natively plug a MMFeedbacks into it, that will play at the spawn position every time a loot object drops.
- Debug : this section lets you spawn massive quantities of objects at runtime, to check on both their position and if the outcome matches what you had in mind when defining your loot table. An option also lets you draw gizmos showing the drop area.
Going further with the loot system
At the core of this system is the MMLootTable class. It’s a generic class that defines a list of objects to “loot”, or pick, each of them weighted. It’s got two simple methods : ComputeWeights, which you’ll usually only call once at initialization, and GetLoot, that will return one object, picked randomly from the table. If you want more than one object to be picked, you’d just repeat the operation. In the example above we do this for game objects, but this class being generic, you can do it for anything else. The engine comes with ready made implementations with the MMLootTableFloat (for floats) and MMLootTableString (for strings), and you can of course add more to suit your specific needs.