General Information
The Character Abilities are the scripts that will enable your character to perform actions. Whether it’s jumping, running, or pressing a button, that’s where it happens. Having these separated ability scripts will allow for the best possible architecture. It’ll also make it much easier for you to create your own abilities.
Standard Abilities
-
CharacterButtonActivation : This component allows your character to interact with button powered objects (dialogue zones, switches…). Nothing special to setup here.
-
CharacterConeOfVision : Projects a cone of vision around the character, that can be used to detect targets, or purely for decorative purposes.
-
CharacterCrouch : Allows for the resizing of the controller (and dedicated animations) when the crouch button is pressed
-
CharacterDash2D/3D : This ability allows the character to dash in the specified direction. You can decide on a Dash Mode, specify a curve animation to use to move the character, the dash’s duration, the distance it should cover, and more.
-
CharacterDamageDash2D/3D : This ability is similar to the regular Dash ability, but will also apply damage while dashing. To do so, this ability enables/disables a DamageOnTouch object, that should be created, positioned under the Character, and bound to the DamageDash’s TargetDamageOnTouch slot in its inspector. This ability is also a good reference if you’re looking at examples of how to extend existing abilities to add more features to them.
-
CharacterDirectionMarker : this ability will let you orient an object on a Character towards either the aim direction or the movement direction, and two examples of it on the Colonel demo character
-
CharacterFallDownHoles2D : A 2D only ability, it will make your character fall down “holes”, defined by the hole layer mask you’ll have specified in the TopDownController2D’s inspector.
-
CharacterGridMovement : lets you walk on a grid (meaning your character will always stop its movement perfectly centered on a grid’s cell). This works in both 2D and 3D and will require that a GridManager be present and properly setup in your scene. You’ll find examples of that setup in the Minimal2DGrid, Minimal3DGrid and Explodudes demo scenes. Note that this is a different system than the “regular” CharacterMovement, and most movement related abilities (jump, dash) or AI actions won’t work with grid movement.
-
CharacterHandleWeapon : Lets your character equip and use a weapon, whether it’s from an inventory or not.
-
CharacterHandleSecondaryWeapon : Same thing, but with one more weapon.
-
CharacterInventory : Lets your character bind itself to inventories, to be able to equip weapons and more. Note that the engine doesn’t support multiplayer inventories at the moment, but it’s been heavily requested and is coming to a future update.
-
CharacterJump2D/3D : Will make your character jump when you press the jump button. Note that the 3D version will actually move your character’s controller, while the 2D version will keep it in place, an animation being responsible for the jump illusion. Note that in both cases, your character won’t be considered grounded anymore while jumping.
-
CharacterMovement : Basic, ground based movement. You’ll be able to specify the walk speed, the idle threshold, acceleration and deceleration, footstep particles, and more from its inspector. You can also force free, 2, 4 or 8 directional movement.
-
CharacterOrientation2D/3D : Will rotate or flip your character to have it face the movement’s direction, the weapon’s direction, or both.
-
CharacterPathfinder3D : A 3D only ability, will let your character find a path on a navmesh. That navmesh will need to be present in the scene before it can be used though.
-
CharacterPathfindToMouse : 3D only, lets you click on the ground and have your character move to this target, as well as a demo of it on the LoftSuspendersMouseDriven demo character
-
CharacterPause : Allows the character with this ability (and the player controlling it) to use the pause button to pause the game
-
CharacterPersistence : lets you have a character persist with its exact current state when transitioning to a new scene
-
CharacterPush3D : allows a character to push rigidbodies around
-
CharacterRagdollOnDeath : add this to a character and it’ll trigger its MMRagdoller to ragdoll on death
-
CharacterRotateCamera : This ability will let you rotate the camera on the vertical axis (z in 2D, y in 3D) around your character. It comes with options to also rotate input to match the camera’s direction, determine rotation space and speed, and a dedicated aim option for weapons. You’ll find an example of it in action in the Loft3D demo scene (use L and M to rotate the camera).
-
CharacterRotation2D : Lets your 2D character change its model’s rotation to match the direction it’s going.
-
CharacterRun : Lets your character run at the specified speed when pressing the run button
-
CharacterShipMovement: lets you control the movement of a character with acceleration on the y axis and rotation on x. See examples of it in action with two demo playable characters (MinimalSpaceship2D and 3D)
-
CharacterStun : Add this component to a character and it’ll be able to be stunned. To stun a character, simply call its Stun or StunFor methods. You’ll find test buttons at the bottom of this component’s inspector. You can also use StunZones to stun your characters.
-
CharacterSurfaceSounds : Add this component to a character and it’ll let you define a number of surfaces and associate walk and run sounds to them. It will also let you trigger events when entering or exiting these surfaces. Note that urfaces are evaluated from top to bottom. The first surface definition that matches the current detected ground will be considered the current surface. So make sure your order them accordingly.
-
CharacterSwap : This ability will allow you to swap control over multiple characters in a single scene. For an example of that, please refer to the Minimal2DCharacterSwap demo scene. Note that this ability is dependent on normal character instantiation by the LevelManager, and will only work within the framework of a scene, not across scenes.
-
CharacterSwitchModel : Lets you switch the appearance of your character for another model.
-
CharacterTimeControl : Lets your character change the current timescale to the one specified in the inspector when pressing the Time Control button, for the duration of your choice, lerping it or not.
-
Character Ability Node Swap : This ability lets you specify a new set of abilities, and swap to them at the press of a button.
Ability overview
So what does an ability do ? If you’re interested in how the code works, the easiest way to find out is to look at the CharacterAbility.cs class, from which all abilities inherit. It has a few methods, let’s go over the main ones quickly :
- Initialization : as the name implies, that’s where the base class will get parts of the Character or Scene that’ll be regularly useful in children abilities. Stuff like the camera, TopDownController component, input manager, etc. A child ability will typically use this to grab additional components or initialize variables (number of jumps, etc).
- Animation methods : InitializeAnimatorParameters and UpdateAnimator : use the first one to register animation parameters, and the second to update them. This is done in two steps to avoid checking for the existence of each parameter every frame, which would end up causing performance issues.
- HandleInput : overridden by each ability to check for the state of relevant buttons and axis. If a certain button is pressed/released, this method will call other methods in the ability.
- Early/Process/Late Process ability : these methods are called by the state machine at each update.
- Reset : this method will be called when the character dies. Useful to reset counters etc.
- Play/Stop Sfx : methods used to trigger the abilities sounds. By default each ability comes with 3 sounds (defined per ability in their inspector) : one when it starts, one while it’s used, and one when it stops. You can of course only use one or none of these. If you create your own ability, you’ll need to call these methods to trigger the sounds.
Organizing abilities
From v1.10 onwards, you can now split abilities across multiple game objects (or nodes).
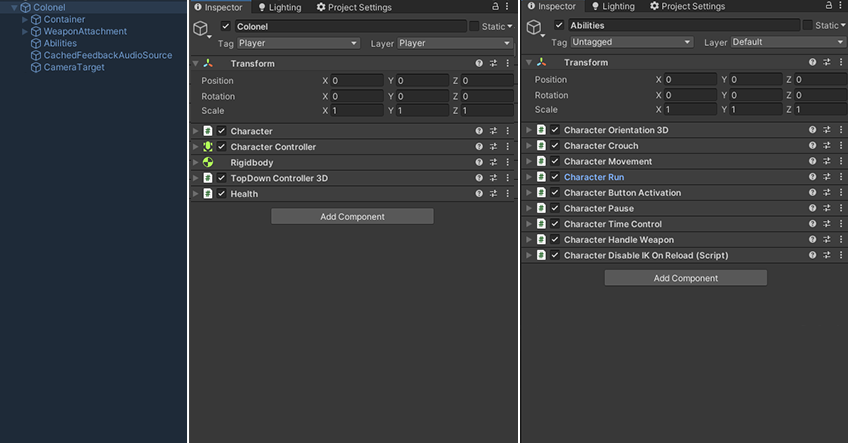
It’s quite easy to setup. By default, the Character component will look for abilities on its own node (usually the top level of your Character’s hierarchy). Additionnally, you can bind any number of additional nodes you want to its AdditionalAbilityNodes array. Usually you’ll have (like in the image above) a number of empty game objects with abilities on them. Simply drag these into that array, and the Character component will register them on initialization.
This can be useful for a number of things. It avoids having too many components on a single object, which can become confusing when looking for a specific ability or field. It also lets you enable/disable entire ability nodes at once, or even swap entire ability sets. The Colonel prefab, which you’ll find in action in the Colonel demo scene, is built that way.
The State Machine
The Character component is responsible for triggering the various abilities. It does so using state machines. A StateMachine is a design pattern that will basically store a current state and the previous one (if you’re curious for more, look at the code or API documentation). By default a Character uses two state machines :
- MovementState : accessed via the _movement property from any Ability, it represents the current action the Character is performing.
- ConditionState : accessed via the _condition property from any Ability, it stores the current status of the Character (normal, dead, paused, etc).
The way it works is that at the start of a Scene, the Character will initialize all Abilities, then every frame, call their EarlyProcess, Process and LateProcess methods, and eventually reset them on Death. Other State Machine implementations would usually only call the current state’s ability on Update. This one doesn’t, for a number of reasons, but mostly to make it easy to extend the system, without having to rewrite everything or modify existing classes. This means that each ability is responsible for handling its own input, preventing the entry into its methods (by testing if the current state allows it - you can’t walk while not grounded for example). Most abilities included in the engine don’t use EarlyProcess or LateProcess, but it’s still a possibility if you need it.
Authorizing abilities
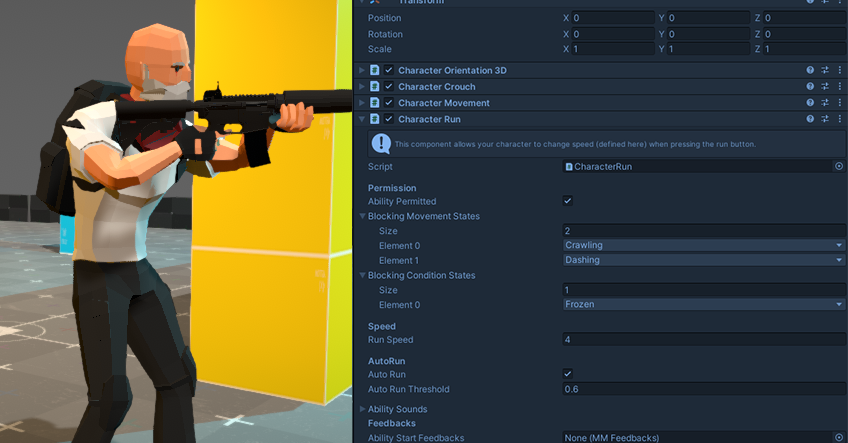
Most abilities define their own base restrictions, which are states in the state machines described above from which you can’t transition to the ability. For example, by default, you can’t jump while jetpacking. These default restrictions cover the most requested use cases, but in your game you may want to restrict things further. This can be done by extending the base ability to change the condition check, or simply, from the inspector, by adding states to the Blocking Movement States and Blocking Condition States lists, as pictured in the image above.
Create your own ability
The easiest way to create your own ability is to extend CharacterAbility, the same way all abilities in the engine right now do. Override methods (make sure you call the base one at the start then) when needed. To test your new ability, you just have to add it to an existing Character, and it’ll be automatically added to the state machine, and processed like the others. One thing to keep in mind is the interaction with the other abilities. You may want to extend other abilities to prevent or authorize certain state changes. Additionnally, your Ability may require new states. You can declare these in CharacterStates.cs (anywhere in the MovementStates or CharacterConditions enums, the order doesn’t matter).
For inspiration you can have a look at the current Character Abilities, as they are exactly what you’re trying to create, and are good examples of what you can achieve. Here’s a good basis I used to create them, as I found out these methods were the ones I used to override the most. Make sure you replace all the TODOs with your stuff :
using UnityEngine;
using System.Collections;
using MoreMountains.Tools;

namespace MoreMountains.TopDownEngine // you might want to use your own namespace here
{
    /// <summary>
    /// TODO_DESCRIPTION
    /// </summary>
    [AddComponentMenu("TopDown Engine/Character/Abilities/TODO_REPLACE_WITH_ABILITY_NAME")]
    public class TODO_NEW_ABILITY_NAME : CharacterAbility
    {
        /// This method is only used to display a helpbox text
        /// at the beginning of the ability's inspector
        public override string HelpBoxText() { return "TODO_HELPBOX_TEXT."; }

        [Header("TODO_HEADER")]
        /// declare your parameters here
        public float randomParameter = 4f;
        public bool randomBool;

        protected const string _yourAbilityAnimationParameterName = "YourAnimationParameterName";
        protected int _yourAbilityAnimationParameter;

        /// <summary>
        /// Here you should initialize our parameters
        /// </summary>
        protected override void Initialization()
        {
            base.Initialization();
            randomBool = false;
        }

        /// <summary>
        /// Every frame, we check if we're crouched and if we still should be
        /// </summary>
        public override void ProcessAbility()
        {
            base.ProcessAbility();
        }

        /// <summary>
        /// Called at the start of the ability's cycle, this is where you'll check for input
        /// </summary>
        protected override void HandleInput()
        {
            // here as an example we check if we're pressing down
            // on our main stick/direction pad/keyboard
            if (_inputManager.PrimaryMovement.y < -_inputManager.Threshold.y)
            {
                DoSomething();
            }
        }

        /// <summary>
        /// If we're pressing down, we check for a few conditions to see if we can perform our action
        /// </summary>
        protected virtual void DoSomething()
        {
            // if the ability is not permitted
            if (!AbilityPermitted
                // or if we're not in our normal stance
                || (_condition.CurrentState != CharacterStates.CharacterConditions.Normal)
                // or if we're grounded
                || (!_controller.Grounded))
            {
                // we do nothing and exit
                return;
            }

            // if we're still here, we display a text log in the console
            MMDebug.DebugLogTime("We're doing something yay!");
        }

        /// <summary>
        /// Adds required animator parameters to the animator parameters list if they exist
        /// </summary>
        protected override void InitializeAnimatorParameters()
        {
            RegisterAnimatorParameter(_yourAbilityAnimationParameterName, AnimatorControllerParameterType.Bool, out _yourAbilityAnimationParameter);
        }

        /// <summary>
        /// At the end of the ability's cycle,
        /// we send our current crouching and crawling states to the animator
        /// </summary>
        public override void UpdateAnimator()
        {

					bool myCondition = true;
            MMAnimatorExtensions.UpdateAnimatorBool(_animator, _yourAbilityAnimationParameter, myCondition, _character._animatorParameters);
        }
    }
}