Introduction
The TopDown Engine includes a lot of demo characters, and they all come with a number of animations. In the various demos, you’ll find some characters animated using spritesheets, some using Mecanim, or 3D fbx animated models. It’s really up to you to choose the animation method that fits your skills and needs. But the Engine should have you covered whatever method you decide on, as long as it’s supported by Unity. It’s agnostic when it comes to animation, and its scope ends at sending and updating animator parameters. What you decide to do with them is up to you, allowing you to leverage the full power of Unity’s animation system.
This page won’t cover how to create your animations, or how to setup your animator. Unity has a lot of documentation on that, go check it out. It will however cover the specifics of the TopDown Engine and how it’ll help you create nice animated characters.
Animation Controllers
In most cases you’ll need an Animation Controller to setup your animations. The asset includes a bunch of these, I’d recommend using the Koala one as a starting point for yours as it includes most animation parameters, so you won’t have to enter them all again. You can simply duplicate it, and then drag your animations into it, replacing the Koala ones as you go, and adding more parameters if needed.
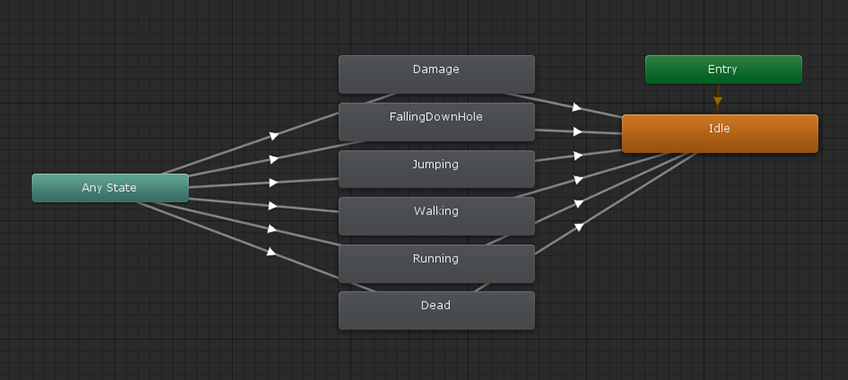
The Animation Controller is made of two big parts : on one side Animation Parameters that will get updated every frame by the Character and Character Abilities scripts to reflect the current state of the character, and on the other a state machine that will allow you to determine in which conditions each animation should be played and how to transition from one to the other.
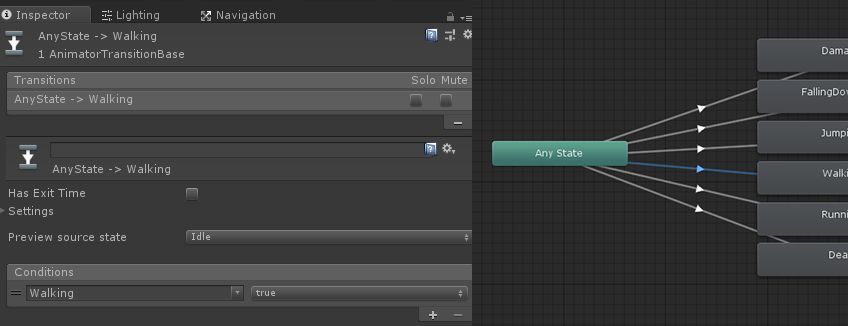
You’ll notice the demo animators are very simple in terms of workflow, usually based on an “any state” pattern, suitable for a demo, but that you’ll probably want to change for each of your specific characters. The engine really encourages you to create your own graph. Each character is unique, and has its own needs in terms of animation, so there’s no silver bullet, and you’ll have to learn how to setup Unity animation transitions if you want to create complex characters. You can look at the Tie animator for an example of a more traditional animator setup (as opposed to the Koala’s “any state” pattern).
Alternatively, if you’re happy with one of the demo animator setups and just want to replace animations with yours, you can use an Animator Override Controller (right click, create, animator override controller). Then, from its inspector, select the animator controller you want to override, and simply drag and drop your animations in the appropriate slots.
Animation and scripts
The TopDown Engine’s character system has animation interfaces built-in so you don’t lose time on that. Every ability comes already loaded with corresponding animation parameters. To update animation parameters, you can either use Unity’s built-in methods or the ones provided with the TopDown Engine. It’s really quite simple, as from any ability you only need to override two methods. Let’s have a look at how it’s used in the Dash ability :
First, usually towards the top of the ability class, we declare two variables for each animation parameter :
// animation parameters
protected const string _dashingAnimationParameterName = "Dashing";
protected int _dashingAnimationParameter;
InitializeAnimatorParameters : This method “registers” parameters, for later use. Basically it just adds that parameter to a list, after having checked its existence in the Animation Controller, to avoid potential errors at runtime. If that parameter doesn’t exist, update requests will simply do nothing, without triggering errors. This allows you to share a single animator amongst many characters, without having to copy all parameters into all the controllers. This method is only called at Initialization. It also takes care of hashing the string into an int for increased performance.
protected override void InitializeAnimatorParameters()
{
	RegisterAnimatorParameter(_dashingAnimationParameterName, AnimatorControllerParameterType.Bool, out _dashingAnimationParameter);
}
UpdateAnimator : This method, called every frame, will update the animator parameters with their current value. In it you should only have calls to MMAnimator.UpdateAnimatorBool/Int/Trigger.
public override void UpdateAnimator()
{
	MMAnimatorExtensions.UpdateAnimatorBool(_animator, _dashingAnimationParameter, (_movement.CurrentState == CharacterStates.MovementStates.Dashing), _character._animatorParameters);
}
Adding new animations
To add a new animation, all you have to do is create it, drag it into your character’s animation controller, and create a transition to it. If it requires new animation parameters, make sure you add them both to your animation controller’s parameters list and register/update them in your script(s) using the above methods, from existing or new abilities.
Animation Parameters
The engine defines a number of animation parameters, used by its various abilities and classes. You won’t need all of them on your Character’s animator, but having them all won’t hurt. You can add them one by one, manually, or you can add a CharacterAnimationParametersInitializer component to your animator, and press the AddAnimationParameters button on it, and it’ll add them for you. Once this is done, you can safely remove that component.
Here’s a full list of all the animation parameters already in the engine:
| Parameter Name | Ability | Type | Role |
|---|---|---|---|
| Alive | Character | Boolean | True if the character is currently alive |
| Grounded | Character | Boolean | True if the character is touching the ground |
| xSpeed | Character | Float | The current x speed of the character |
| ySpeed | Character | Float | The current y speed of the character |
| zSpeed | Character | Float | The current z speed of the character |
| HorizontalDirection | CharacterOrientation2D | Float | The direction of the character on the x axis |
| VerticalDirection | CharacterOrientation2D | Float | The direction of the character on the y axis |
| RelativeForwardSpeed | Character | Float | The relative (to the character’s forward) speed |
| RelativeLateralSpeed | Character | Float | The relative (to the character’s forward) lateral speed |
| RelativeForwardSpeedNormalized | CharacterOrientation3D | Float | The relative forward speed, normalized |
| RelativeLateralSpeedNormalized | CharacterOrientation3D | Float | The relative lateral speed, normalized |
| RemappedForwardSpeedNormalized | CharacterOrientation3D | Float | The remapped forward speed value between 0 and the max run speed |
| RemappedLateralSpeedNormalized | CharacterOrientation3D | Float | The remapped lateral speed value between 0 and the max run speed |
| YRotationSpeed | CharacterOrientation3D | Float | The instant rotation speed of the model |
| YRotationOffset | CharacterOrientation3D | Float | The y rotation offset between the current and the target rotation to the animator, in degrees |
| Idle | Character | Boolean | True if the character is currently idle |
| Activating | CharacterButtonActivation | Boolean | True if the character is currently activating something |
| Crouching | CharacterCrouch | Boolean | True if the character is currently crouching |
| Crawling | CharacterCrouch | Boolean | True if the character is currently crawling |
| Damage | Health | Trigger | Triggered when the character takes damage |
| Dashing | CharacterDash | Boolean | True if the character is currently dashing |
| DamageDashing | CharacterDamageDash | Boolean | True if the character is currently damage dashing |
| DashStarted | CharacterDashing | Boolean | True if the character has started a dash this frame |
| Death | Health | Trigger | Triggered when the character dies |
| FacingDirection2D | CharacterOrientation2D | Float | Introduced in v1.3, 0: west, 1: north, 2: east, 3: south |
| FallingDownHole | CharacterFallDownHoles2D | Boolean | True if the character is currently falling down a hole |
| WeaponEquipped | CharacterHandleWeapon | Boolean | True if a weapon is currently equipped |
| WeaponEquippedID | CharacterHandleWeapon | Int | -1 if no weapon is equipped, otherwise the WeaponAnimationID specified on the weapon |
| Jumping | CharacterJump | Boolean | True if the character is currently jumping |
| DoubleJumping | CharacterJump | Boolean | True if the character is currently double jumping |
| HitTheGround | CharacterJump | Boolean | True if the character just hit the ground this frame |
| Speed | CharacterMovement | Float | The current horizontal speed of the character |
| Walking | CharacterMovement | Boolean | True if the character is currently walking |
| Running | CharacterRun | Boolean | True if the character is currently running |
| Pushing | CharacterPush3D | Boolean | True if the character is currently pushing something |
| Random | Character | Float | A frequently refreshed random value between 0f and 1f that you can use to add randomness to your animations |
| RandomConstant | Character | Int | A random int (between 0 and 1000), generated at Start and that’ll remain constant for the entire lifetime of this animator, useful to have different characters of the same type |
| Stunned | CharacterStun | Boolean | True if the character is currently stunned |
Weapon Animation Parameters
In addition to these animation parameters, you’ll find a number of animation parameters in CharacterHandleWeapon whose name you can set from the inspector of each weapon directly. Note that these animation parameters will update on the Weapon (if you’ve bound an Animator to your Weapon’s inspector) and on the Character’s Animator (if you’ve set AutomaticallyBindAnimator to true on your CharacterHandleWeapon ability):
| Parameter property | Ability | Type | Role |
|---|---|---|---|
| WeaponEquipped | CharacterHandleWeapon | Bool | True if a weapon is currently equipped |
| WeaponEquippedID | CharacterHandleWeapon | Int | The ID of the currently equipped weapon |
| IdleAnimationParameter | CharacterHandleWeapon | Boolean | True if the Weapon is idle |
| StartAnimationParameter | CharacterHandleWeapon | Boolean | True if the Weapon is getting started |
| DelayBeforeUseAnimationParameter | CharacterHandleWeapon | Boolean | True if the weapon is in its DelayBeforeUse state |
| DelayBetweenUsesAnimationParameter | CharacterHandleWeapon | Boolean | True if in between two uses |
| StopAnimationParameter | CharacterHandleWeapon | Boolean | True when the weapon gets stopped |
| ReloadStartAnimationParameter | CharacterHandleWeapon | Boolean | True when reloading starts |
| ReloadStopAnimationParameter | CharacterHandleWeapon | Boolean | True when reloading is complete |
| ReloadAnimationParameter | CharacterHandleWeapon | Boolean | True while the weapon gets reloaded |
| SingleUseAnimationParameter | CharacterHandleWeapon | Boolean | True at the exact frame the weapon is used (a bullet gets shot, a sword hits, etc) |
| UseAnimationParameter | CharacterHandleWeapon | Boolean | True while the weapon is actively used (in the DelayBeforeUse, DelayBetweenUses, or Use states) |
| EquippedAnimationParameter | CharacterHandleWeapon | Boolean | True when the weapon gets equipped |
| ComboInProgress | CharacterHandleWeapon | Boolean | True if a combo weapon is being used |
| WeaponAngleAnimationParameter | CharacterHandleWeapon | Float | The current angle of the weapon (based on WeaponAim) |
| WeaponAngleRelativeAnimationParameter | CharacterHandleWeapon | Float | The current angle of the weapon, relative to the Character’s facing direction (based on WeaponAim) |
2D Specifics
Animation in the engine works globally the same for 2D and 3D, to the exception of the orientation. In 3D, the CharacterOrientation3D ability will rotate your character’s model. In 2D however, aside from the optional flip, you’ll need animations if you want your character to look like it’s walking up, down, left, right, etc. This is done via the CharacterOrientation2D ability, which offers the option to send to the Character’s animator its horizontal and vertical direction. This can then be used in blend trees to define what animation should play. If you want an example of that, you can look at the Grasslands demo scene. The characters in that scene are 2D sprites, with blendtrees for idle, walk and attack, each of these in 4 directions based on the character’s direction. You can learn more about blend trees in Unity’s documentation.
Debugging animations
If your animations don’t trigger, or if they don’t trigger when you want them to, it can get a bit confusing to figure out what the issue is, especially if you’re new to Unity’s animator. The first thing you should do if that’s the case is probably to read Unity’s resources on Mecanim, such as this one.
Once you’ve got a better understanding of the basics, here are a few ways you can pinpoint the issue :
1. Your character doesn’t animate at all
First, let’s make sure your Character is working fine. Ignoring animations, can you control it? Does it move around? If that’s a no, you’ll want to follow these steps to first create a functioning character.
If you can control it, and it moves around as expected, then the first thing we’ll want to check is whether it updates its movement state correctly. To do so, while in playmode, select your character, and unfold its Character inspector. At the top, you’ll find a MovementState debug field. Start moving around while looking at this field, you should see it change from Idle to Walking. If that’s not the case, maybe you forgot to set the layer of the platform you’re on to Ground. Try fixing that first. To eliminate the risk of your scene having some issues and pinpoint your issue faster, you can test your character in any of the demo scenes (MinimalScene3D or MinimalScene2D) would be the best candidates.
It’s likely that you didn’t bind your animator to your Character, and so the classes and abilities that handle the logic of your character don’t know what animator to update. Select your Character, open its Character inspector, and make sure you dragged your Animator object into the CharacterAnimator slot.
2. Your character does animate, but things don’t happen when you want to
All the engine does is send and update animation parameters. If these do update, the engine is doing its job correctly. You can double check that by pressing play, selecting your character’s animator at runtime, and perform an action (like jump). If the jump parameter turns to true on time (sometimes for a while, sometimes only one frame depending on the parameter), all is fine on the engine’s side. That parameter change is usually instant, as soon as you perform the action, with only a few exceptions.
What’s left to do if all is good on the engine’s and logic side is tweak your animator’s transitions. This can be done like in any Unity project, there’s nothing specific to the engine here. Common offenders will be exit time (both the duration and the associated checkbox, transition duration, interruption sources, etc), but unfortunately there are no universal rules, and each animator requires its own approach based on your context and setup. Setting up transitions can be quite complex, and some may not find it very intuitive. Unity’s got some documentation on it that you may want to check.