Introduction
The TopDown Engine uses managers as central reference points for a lot of classes and components. These managers, always present in your scene, will remember the current points count, the sounds that are playing, or where to spawn the character.
There are a few of them, and in most scenes you’ll have a Game, Level, Input, Time and Sound managers present at all time. Usually you’ll want to place them on empty gameobjects. Their position in your scene doesn’t matter, they’re invisible anyway. It’s good practice to put them out of the way of your level so you don’t delete them by accident.
Game Manager
The Game Manager is a high level manager that is responsible for setting the target frame rate, the game loop, storing the points or handling the timescale. It can also optionnally handle the lives system, defining how many lives the player can have, and how many it has right now. In this case you’ll have to specify a game over screen to redirect the player to in case all lives are lost. In most cases you won’t have to interact with it, but make sure there’s one in your levels. The API documentation is a good place to go to if you want more information about it.
Level Manager
The Level Manager is a reference point for a lot of the engine’s scripts. It maintains a list of player characters in the game (usually one but you could have more if you want). It’s also in charge of spawn and respawn, and checkpoint management.
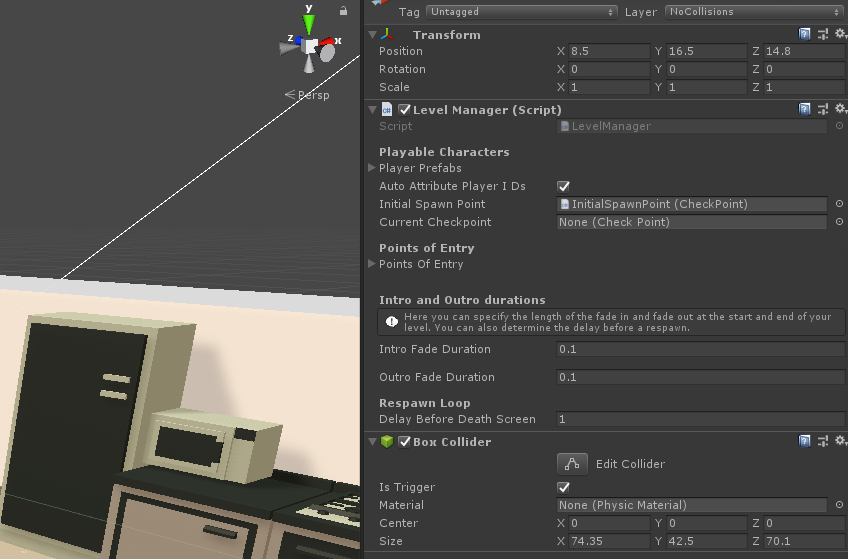
In most cases you’ll want a LevelManager in each of your levels. It needs to be on its own gameobject. From its inspector you can (and should) set what prefab to use as the player. To do so, unfold the PlayerPrefabs dropdown if it’s folded, and just drag a prefab from your project view into the Element0 field. For more information about the “Auto Attribute Player ID” checkbox, check out the Input page.
Note that the LevelManager also lets you have Player Characters already in the scene. In this case, simply empty the PlayerPrefabs list, and drag your Character(s) from the scene into the SceneCharacters array instead.
You can add a BoxCollider to your LevelManager, which will then automatically act as constraining bounds for your Camera, as long as it’s got a CinemachineCameraController on its virtual camera.
From the inspector you’ll also be able to specify delays (before the death screen appears, before respawn…) as well as fade settings for fading the whole screen in and out.
Input Manager
The Input Manager handles the inputs and sends commands to the player. It’s described in more details on the Input page.
![]() This script’s Execution Order MUST be -100, to make sure it always runs first on each Update(), and avoid weird side effects, especially at low framerates. If you’ve imported the engine into a blank project that should already be the case. You can define a script’s execution order by clicking on the script’s file and then clicking on the Execution Order button at the bottom right of the script’s inspector. See this page for more details.
This script’s Execution Order MUST be -100, to make sure it always runs first on each Update(), and avoid weird side effects, especially at low framerates. If you’ve imported the engine into a blank project that should already be the case. You can define a script’s execution order by clicking on the script’s file and then clicking on the Execution Order button at the bottom right of the script’s inspector. See this page for more details.
Sound Manager
The Engine uses the MMSoundManager system to play sounds, whether they’re music, sfx or UI sounds.
Its main features are :
- play / stop / pause / resume / free sounds
- play with full control : loop, volume, pitch, pan, spatial blend, bypasses, priority, reverb, doppler level, spread, rolloff mode, distance
- 2D & 3D spatial support
- Built-in pooling, automatically recycle a set of audio sources for maximum performance
- Built in audio mixer and groups, with ready-made tracks (Master, Music, SFX, UI), and options to play on more groups if needed
- Stop/pause/resume/free entire tracks
- Stop/pause/resume/free all sounds at once
- Mute / set volume entire tracks
- Save and load settings, with auto save / auto load mechanics built-in
- Fade in/out sounds
- Fade in/out tracks
- Solo mode : play a sound with one or all tracks muted, then unmute them automatically afterwards
- PlayOptions struct for clean API calls
- Option to have sounds persist across scene loads and from scene to scene
- Inspector controls for tracks (volume, mute, unmute, play, pause, stop, resume, free, number of sounds)
- retrocompatibility with older MM systems and events, like MMSfxEvents
- MMSoundManagerEvents : mute track, control track, save, load, reset, stop persistent sounds
You can learn more about the MMSoundManager in its dedicated documentation.
Loading Scene Manager
With Unity, usually when you want to go to another scene (in a menu, or to go from one level to the next for example), you’d use the SceneManager API, and probably the SceneManager.LoadScene() method. Personnally I think that this method doesn’t provide visual feedback to the player, and scene loading on mobile for example can be a few seconds long, so just having a black screen there isn’t really good looking. The engine comes with its own scene change API, that you’re completely free not to use if you don’t like it.
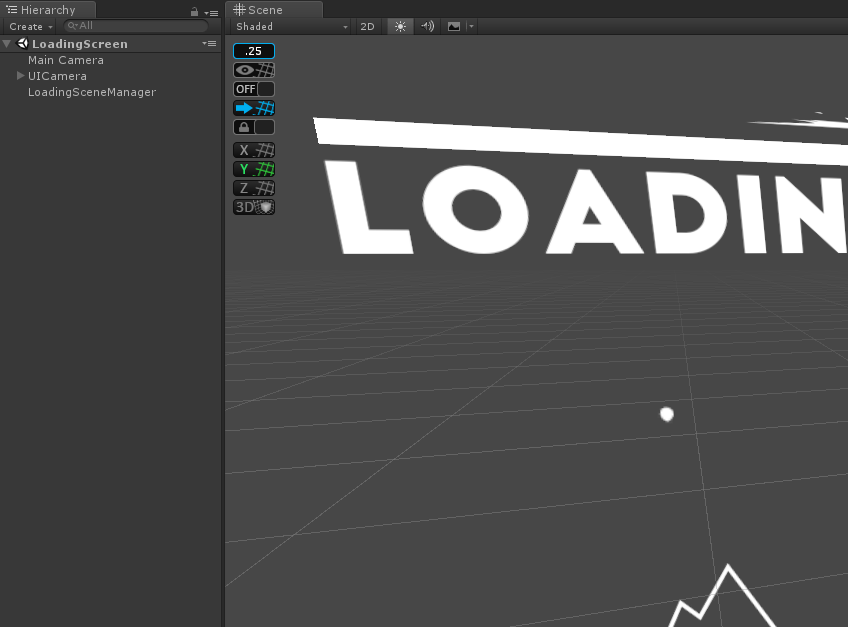
If you want to provide a better experience to your player, you can use the Loading Scene Manager :
- it can be called from anywhere, you don’t have to have a LoadingSceneManager in your scene
- it handles loading (as the name implies), showing an animation and a progress bar
- it’s completely customizable, just edit the Common/LoadingScene scene’s contents. You can easily add your own logo, change the look of the progress bar, what animation is playing, etc.
- it’s pretty simple to use
To use the LoadingSceneManager API, when you want to change level, just call the LoadingSceneManager.LoadScene (string sceneToLoad) method. The string parameter you pass must of course match the name of the scene you’re trying to load. So if you were to load the Koala Dungeon level for example, you’d use :
LoadingSceneManager.LoadScene ("KoalaDungeon");
And the engine will take care of the rest ![]()
Kills Manager
Completely optional, but heavily requested, the Kills Manager lets you track the deaths happening in the scene, and act on them, to trigger events, such as displaying a “success” screen - or instantiating a portal - once all enemies in a scene have been killed, for example. This is typically used to track enemies’ deaths, but it’ll work with anything with a Health, so you could use it to have something happen once 20 crates have been destroyed, for instance.
You can see it in action in the Loft3d demo scene. It’s very easy to setup. Here are the important parts of its inspector :
- Mode : Layer will count all objects with a Health on the specified TargetLayerMask, while List will only consider the Health components you specify in the TargetsList.
- AutoSetKillThreshold : in Layer mode, if AutoSetKillThreshold is true, the KillThreshold will be automatically computed on start, based on the total number of potential targets in the level matching the target layer mask
- DeathThreshold : set automatically or not, this is the maximum amount of Deaths after which the OnLastDeath event will be invoked
- Events : lets you trigger Unity Events every time a death occurs, and when the death threshold gets reached. In the Loft3d demo, a MMF Player (OnLastDeathFeedback) is played on Last Death, which in turn waits one second, then enables a “win” panel, plays a sound and triggers a pause event, pausing the entire game.
- Text Displays : lets you optionally bind texts (or TextMeshPro texts) to display the current kill count vs the total kill count
Save & Load Manager
The engine comes with a simple class to handle basic save and load needs. The MMSaveLoadManager is a static class that allows the save and load of objects in a specific folder and file. It will let you save and load any object to a file. You can find examples of it in action in the Inventory and MMAchievementManager classes, for example.
To save an object, simply call :
MMSaveLoadManager.Save(TestObject, FileName+SaveFileExtension, FolderName);
Then to load it :
TestObject = (YourObjectClass)MMSaveLoadManager.Load(typeof(YourObjectClass), FileName + SaveFileExtension, FolderName);
There are also helper methods to delete saves, save folders, etc. Don’t hesitate to check out the class, it’s fully commented, as usual. You can also specify what IMMSaveLoadManagerMethod the system should use. By default it’s binary but you can also pick binary encrypted, json, or json encrypted. You’ll find examples of how to set each of these in the MMSaveLoadTester class
Extending a manager
If for some reason you want to modify a manager’s behaviour, the best way to do so is to extend it. That way, you won’t lose your changes if you update the asset. Extending a manager is fairly easy. All you have to do is create a new class, that inherits from the manager whose behaviour you want to change, like so :
using UnityEngine;
using System.Collections;
using MoreMountains.Tools;
using System.Collections.Generic;


namespace MoreMountains.TopDownEngine
{
	public class NewGameManager : GameManager
	{
		protected override void Start()
	    {
			base.Start();
			MMDebug.DebugLogTime("new game manager");
	    }

		public override void Pause()
		{
			base.Pause();
			MMDebug.DebugLogTime("new game manager pause");
		}

		public override void AddPoints(int pointsToAdd)
		{
			base.AddPoints(pointsToAdd);
			MMDebug.DebugLogTime("new game manager add points");
		}
	}
}
In this example, a new GameManager is created, and a few of its methods are overridden. They don’t do much, they just do what the base class does, and then output a debug message. Of course, you could have them do much more. All you have to do then is to place that new manager in your scene on an object, and remove the base one.
You can also decide to add new features to your extended version of a manager. Like so, for example :
using UnityEngine;
using System.Collections;
using MoreMountains.Tools;
using System.Collections.Generic;


namespace MoreMountains.TopDownEngine
{
	public class NewGameManager : GameManager
	{
		public virtual void Hello()
		{
			MMDebug.DebugLogTime("hello!");
		}
	}
}
In that case, if you want to call that Hello() method from another class using the singleton pattern, remember to cast appropriately, like this :
(NewGameManager.Instance as NewGameManager).Hello();